

Holiday nail art always looks easy in photos. Then you sit down at the kitchen table with a bottle of red and a toothpick, and your candy cane comes out looking like a question mark.
These easy Christmas nails are picked with that moment in mind. Every set is broken down into what you need and the one trick that does the heavy lifting: taping off a diagonal tip, building plaid in layers, or letting snow dots hide a wobbly tree. You’ll find red French tips with pearls, berry vines, mistletoe garlands, green sparkle, and gingerbread icing. There are also a couple of showstoppers, with an honest note on which parts to copy and which to leave to a pro.
If you’d rather keep your holiday nails even quieter, these simple Christmas nails stick to one small accent. Otherwise, grab your brushes and start scrolling.
Your Easy Holiday Nail Kit
You don’t need a salon setup to paint any of these sets. A small kit and the right order of steps will get you most of the way.
The polish. A base coat, a glossy top coat, a sheer nude or pink, and a red, a green, a white, and a gold will cover nearly every design here.
The tools. A thin striping brush, a dotting tool, a small flat brush for cleanup, and a roll of tape. No dotting tool? The round end of a bobby pin works in a pinch.
The order. Prep and base coat first, then color, then a full dry before any art goes on. Rushing that last step is what smudges most home manicures.
Shorter nails also give you less space to fill, so if you’re new to this, trim them down and borrow ideas from these cute short nail designs.
QUICK SKILL CHECK
How steady is your brush hand?
1. Green Plaid With a Gold Chrome Accent
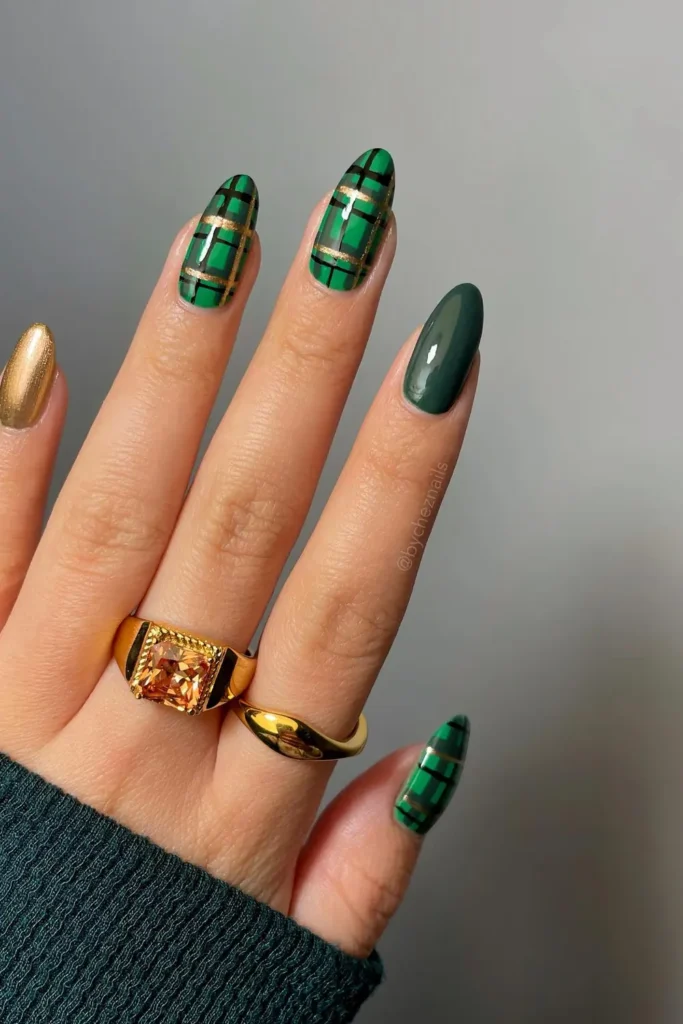
The gold stripe running through the plaid is what makes it look expensive. The ring, middle, and thumb nails wear a bright green tartan built from darker green blocks, thin black lines, and fine gold stripes. The index stays a deep forest green, and the pinky goes full gold chrome.
Plaid looks complicated, but it’s really just lines stacked in layers, and every layer forgives the one before it. A thin striping brush and patience between coats are all you need. Put the plaid on three nails at most, and let the solid shades do the rest.
Plaid in four easy layers
2. Red French Tips With Tiny Pearls
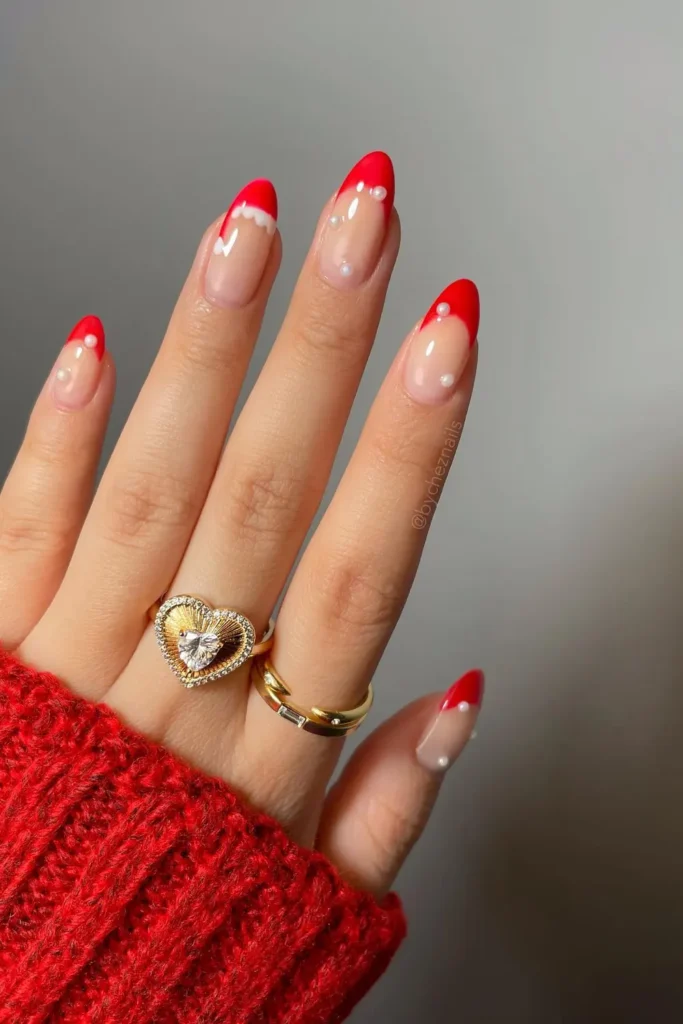
Red French tips with a few tiny pearls is the rare holiday set that takes almost no skill. The pearls are tiny flat-back charms, scattered one or two per nail, and each one goes on by pressing it into a dab of wet top coat. The ring finger swaps the pearls for a white scalloped trim that turns its tip into a Santa hat.
For the tips, paint the red first, then clean up the smile line with a small flat brush dipped in polish remover. That’s far easier than trying to paint a perfect curve in one go. Pearls on a red French also hold their own next to more elegant date night manicures, so the set works well past Christmas.
3. Diagonal Red Tips With a Holly Vine
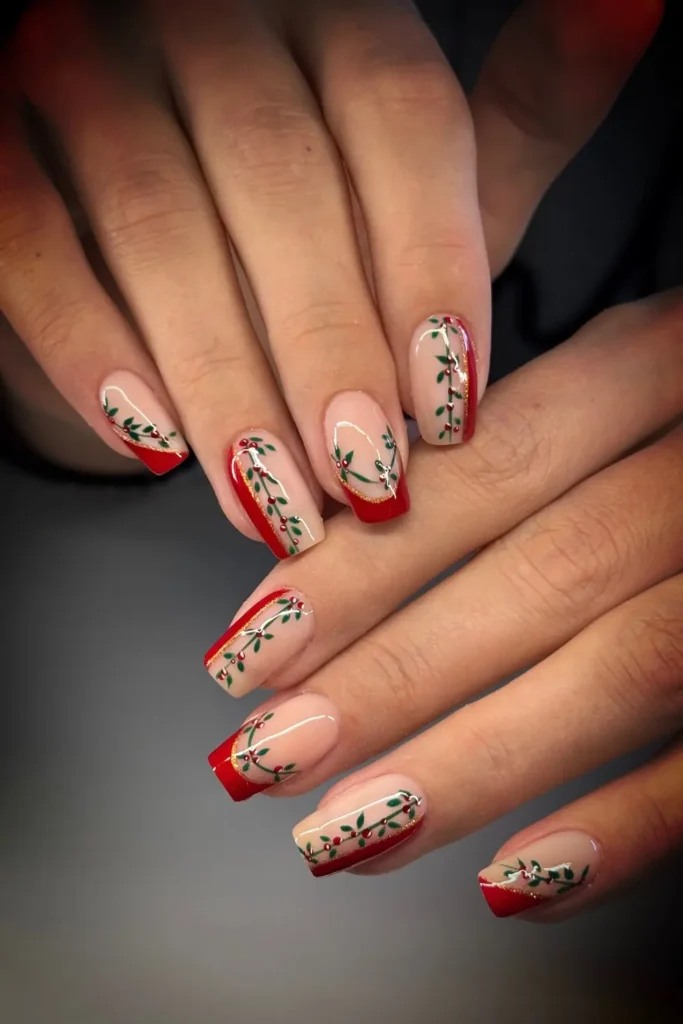
Instead of a straight French, the red sweeps along one side or across the tip on a diagonal, and a thin gold glitter line sits right where the red meets the nude. Above it, a vine of tiny green leaves and red berries follows the same angle on each of these medium square nails.
The angle is your friend at home. A diagonal tip is easier to paint than a curved smile line, and you can mask it off with a strip of tape for a crisp edge. The vine is just one thin line, small leaf strokes, and dots for berries.
What you need: nude and red polish, a gold glitter liner, a thin striping brush, a dotting tool, and tape.
4. Cozy Cottages, Plaid, and Ribbon Bows
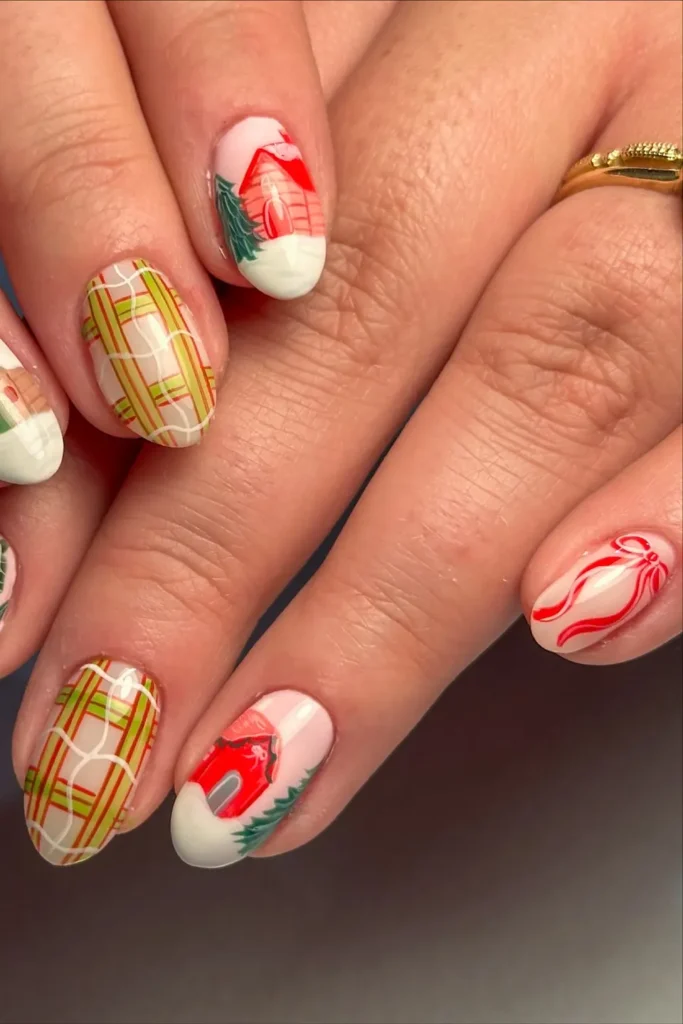
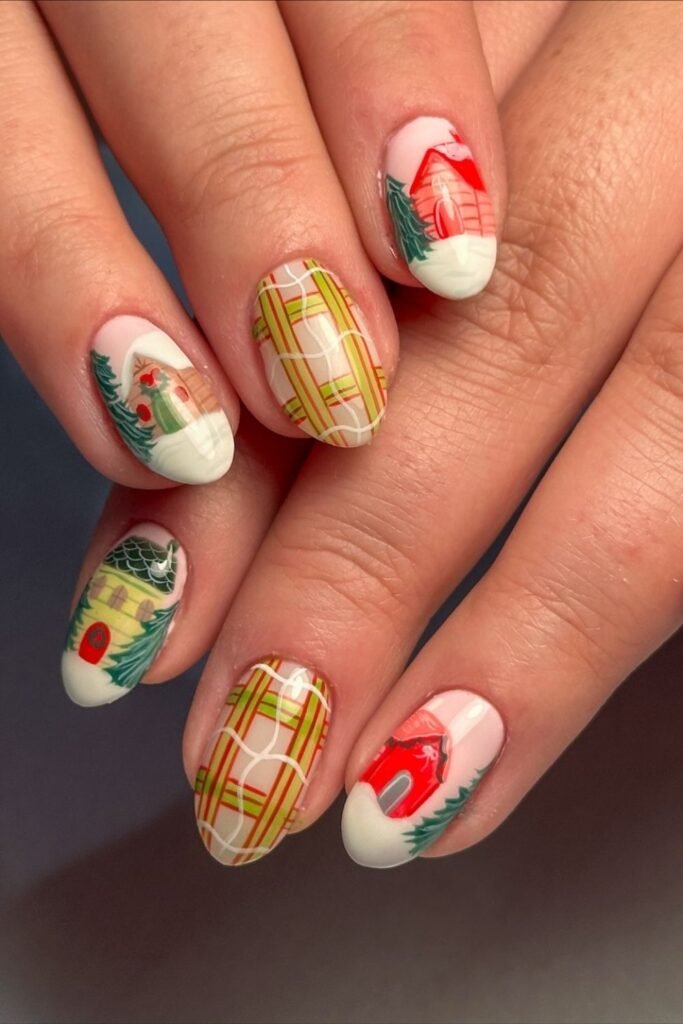
Let’s be honest about this one. The little snow-covered cottages, each with a tree and a red door, take real painting skill and a lot of patience. The plaid and ribbon nails, though, are well within reach.
Copy the full set and you’re looking at a long afternoon, or a booking with your nail artist. Copy just the easy parts, a loose green and red plaid on two nails and a red ribbon bow with long trailing tails on two more, and you can finish in one evening. The bows are only a few curved strokes, which makes them the best place to start.
5. Christmas Cats in Tiny Party Hats
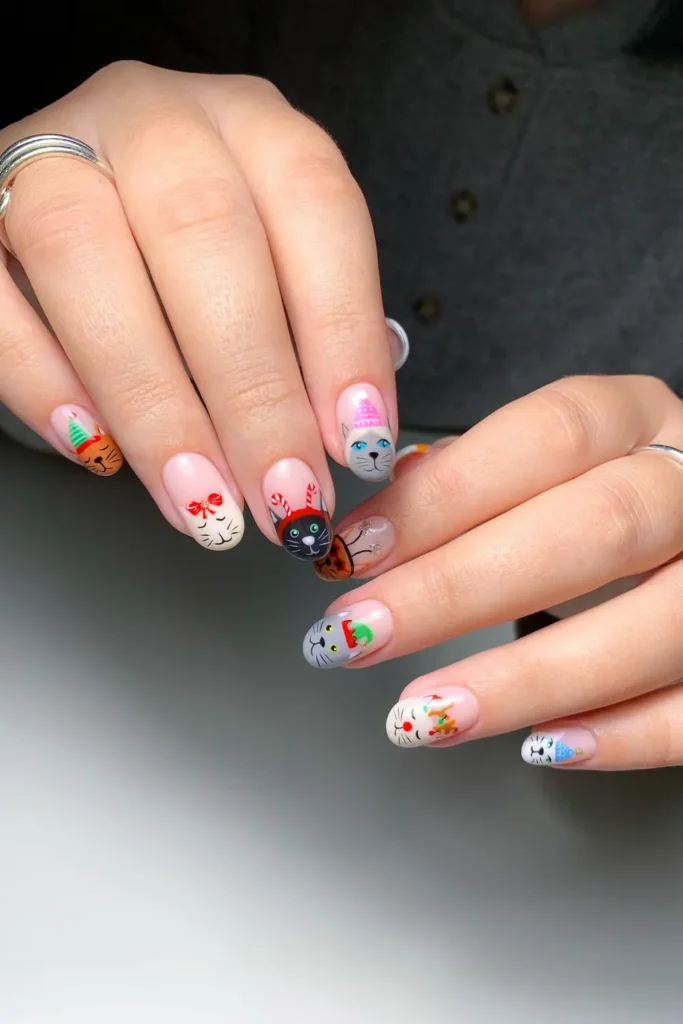
Cat lovers, this one is for you.
Every nail shows a cat dressed for the holidays: a ginger cat in an elf hat, a sleepy white cat wearing a red bow, a black cat with candy cane antlers, and a gray cat in a pink knit beanie, all on a sheer pink base. This is advanced work, with faces, whiskers, and eyes squeezed into a small space.
Shortcut: paint one cat on your ring finger in the simplest version, a white face with closed eyes and a red bow, and leave the rest sheer pink. If you’re still building your skills, warm up with these beginner friendly nail designs first.
6. Green Striped French With Tiny White Bows
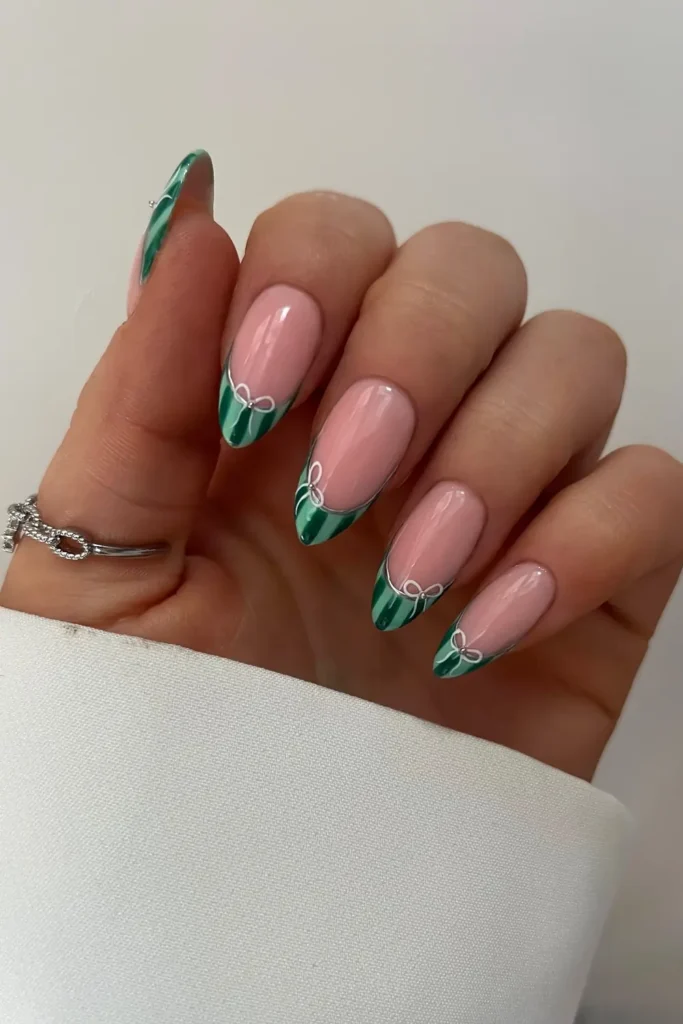
A thin line of silver chrome traces each smile line, and that’s the detail that pulls this set together. Below it, the tips are striped in two shades of green like ribbon candy, and a small white bow with a silver stud sits right at the center of each line.
The stripes look fussy but are simple to build. Paint the whole tip light green, then add darker green stripes with a thin brush. The silver line hides any wobbly edges between tip and base, so it does two jobs at once. Draw the bows last, as two loops and two short tails.
7. Snowy Nude Nails With One Mini Motif Each
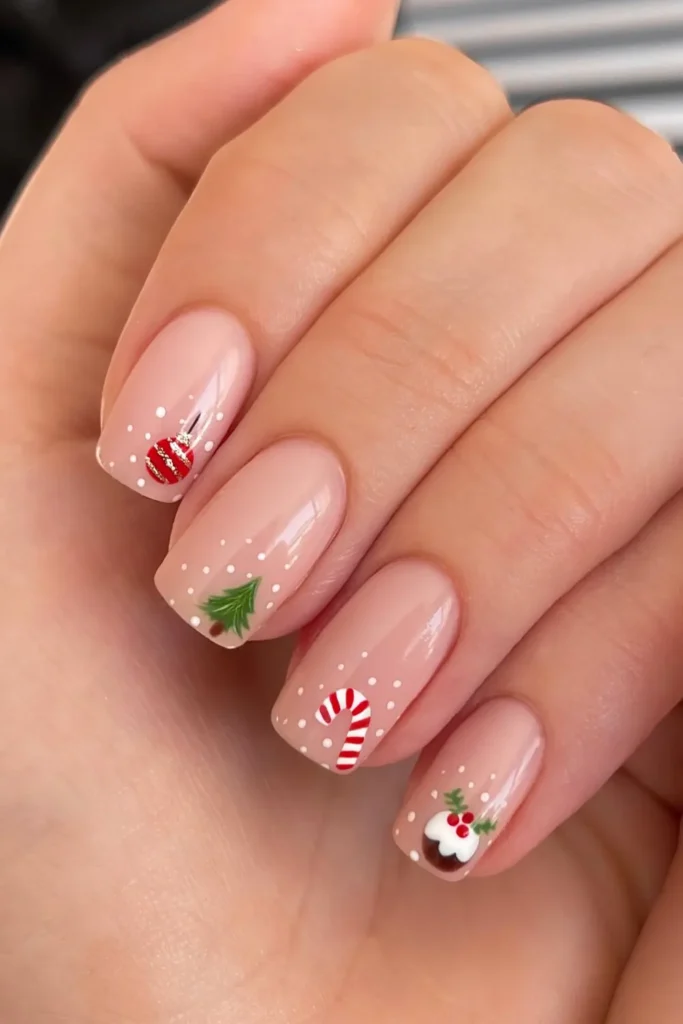
Every nail gets a single little holiday icon on a sheer nude base: a striped ornament, a tiny tree, a candy cane, and a Christmas pudding topped with holly. White dots of falling snow scatter around each one, mostly near the tip.
The snow is the secret. Those dots fill the space and make even a slightly wobbly tree look intentional, so your motifs don’t need to be flawless. Start with the candy cane and the ornament, since both are simple shapes with stripes on top.
Get the look: short square nails, sheer nude polish, a dotting tool for the snow, a thin brush, and red, green, white, and gold polish.
8. Tiny Christmas Icons in the Center of Each Nail
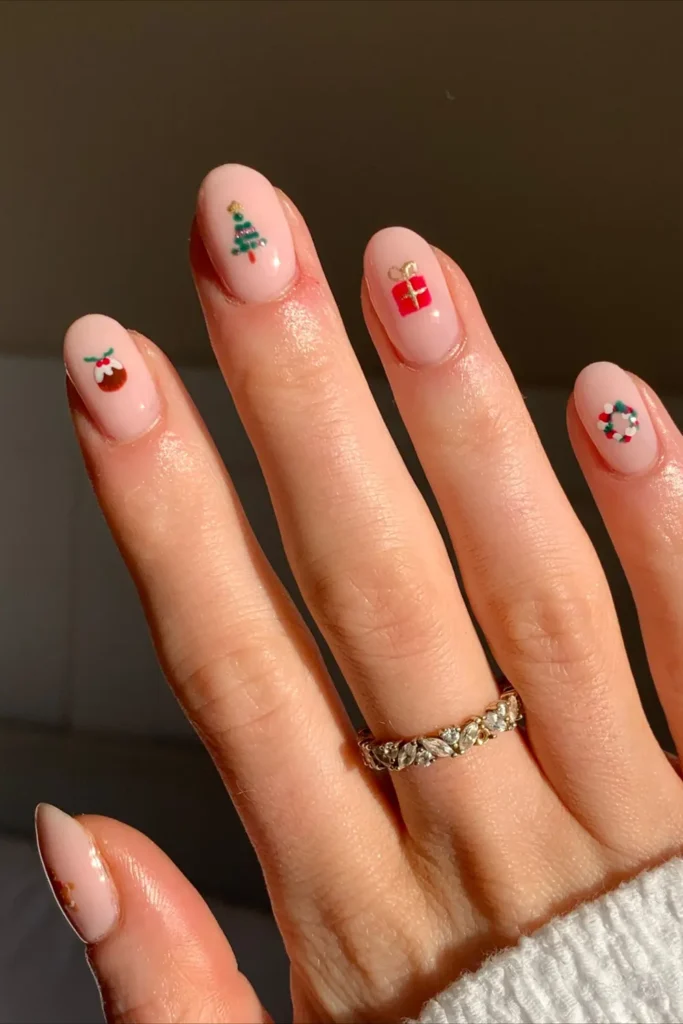
Short oval nails and a soft milky pink base turn into tiny display cases here. Each nail holds one small icon right in the center: a Christmas pudding, a tree with a gold star, a red gift tied with gold, and a wreath made entirely of red, green, and white dots.
Start with the wreath. It’s just dots placed in a circle, so it’s the easiest win in the set, and it’s the same skill behind most simple dotting tool designs. Keep every icon about the size of a pea, and the hand looks dainty instead of busy.
9. Mistletoe Tips With Gold Flecks
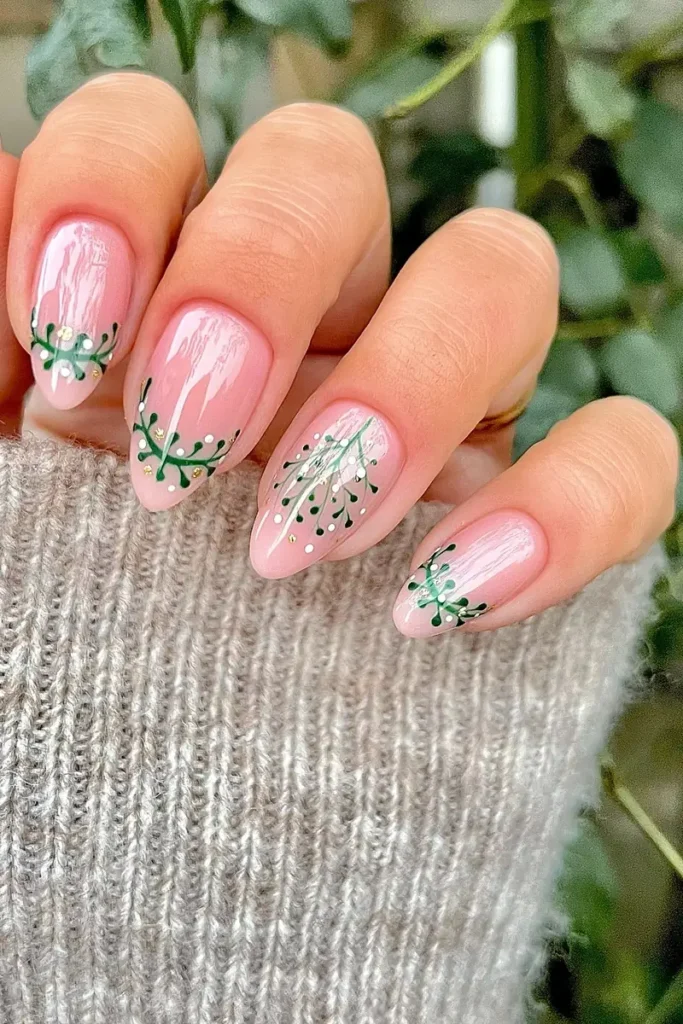
Green sprigs curve along the tip of each nail like a garland, with tiny white berries and flecks of gold leaf tucked between the leaves. The base is a sheer, glowy pink. Paint each stem as one curved line, then pull small leaves out from it with a dotting tool or thin brush.
Keep the garland on every tip and the set feels soft and wintry. Turn one sprig upright on an accent nail and it becomes an obvious mistletoe wink, which comes in handy if the office party has a doorway.
10. Easy Christmas Nails With a Berry Vine Down the Middle
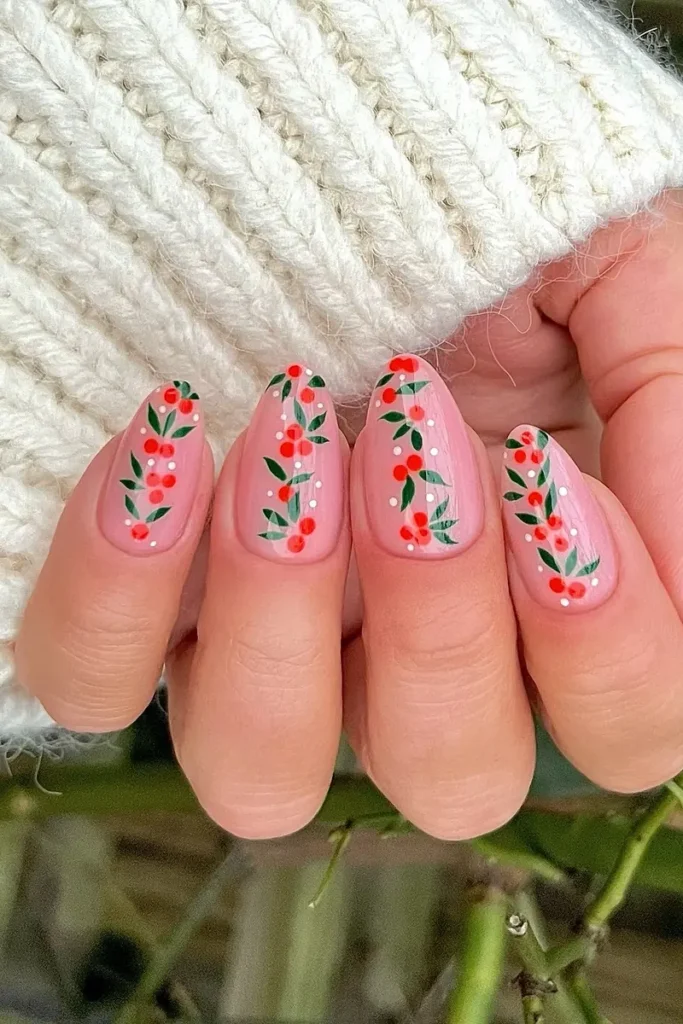
Bright red berries tumble down the center of each nail in a loose vertical line, tucked between small green leaves and a few white dots. On a sheer pink base, the red pops without feeling heavy, and the thumb stays plain pink to give the eye a break.
Every element here is either a dot or a short stroke, which is why it’s friendlier than it looks. Place the berries first in clusters of two or three, add the leaves next, and finish with the white dots. Working in that order keeps the vine from getting crowded.
11. Green Sparkle With Snowy Pine Accents
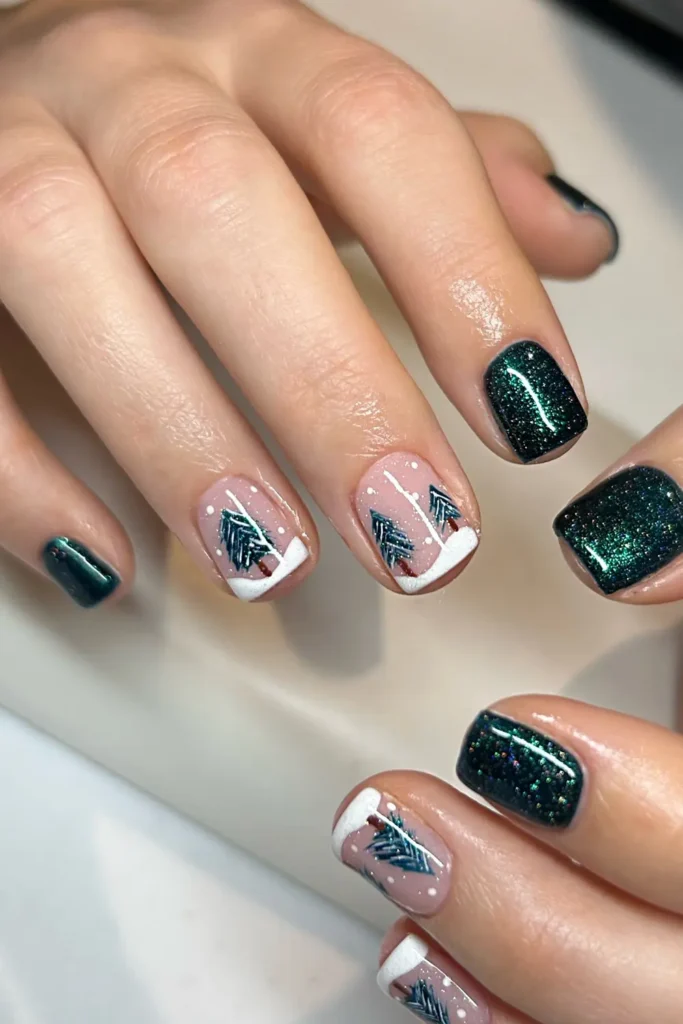
Deep green with a holographic sparkle covers most of these short square nails. A few accent nails switch to sheer nude with a white snowdrift at the tip, a sketchy green pine tree or two, and a few snow dots.
Short nails are easier to paint because there’s less space to fill, and the snowdrift is just a wavy white French. The trees are quick diagonal strokes on either side of a center line. You’ll find more ideas like this in these gel nail art ideas for short nails.
What you need: a green sparkle polish, white polish, a thin brush, and a dotting tool for the snow.
12. Gingerbread Cookie Nails With White Icing
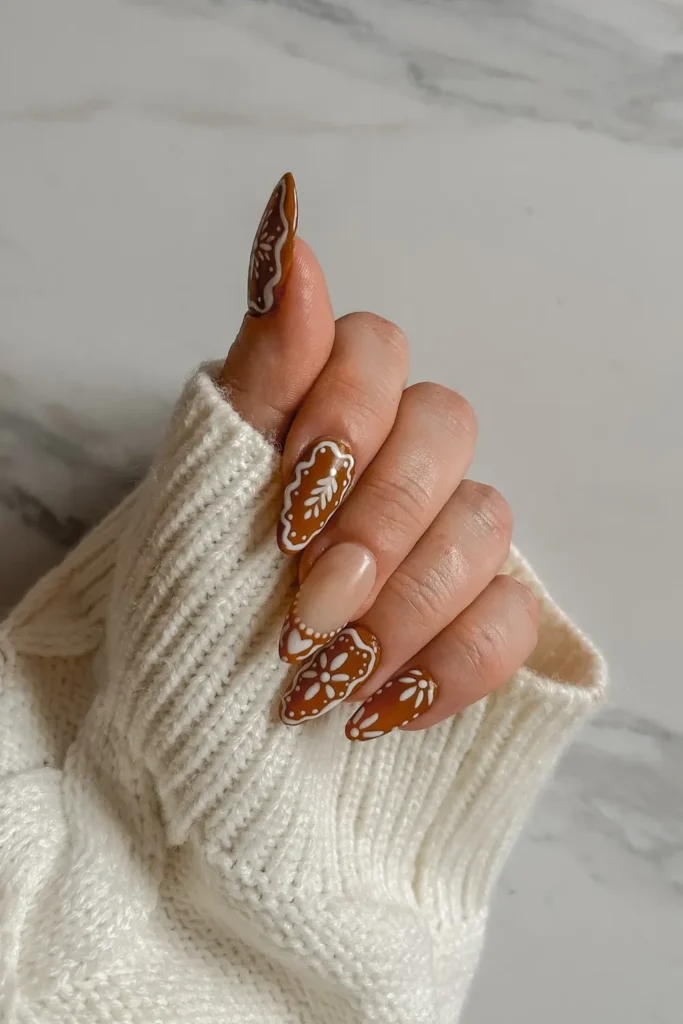
These nails look baked.
A warm caramel brown jelly covers almond nails, and white icing details sit on top: scalloped borders, tiny dots, and little leaf and flower shapes, just like the piped decorations on a gingerbread cookie. One nail stays nude with a cookie brown tip, a row of white dots, and a small white heart.
Shortcut: use a white nail art liner polish, the kind with a long, thin brush built into the cap. It lays down thick, raised lines that look like real icing, and it’s much easier to control than regular white polish.
13. Candy Canes, Gingerbread, and Confetti on White
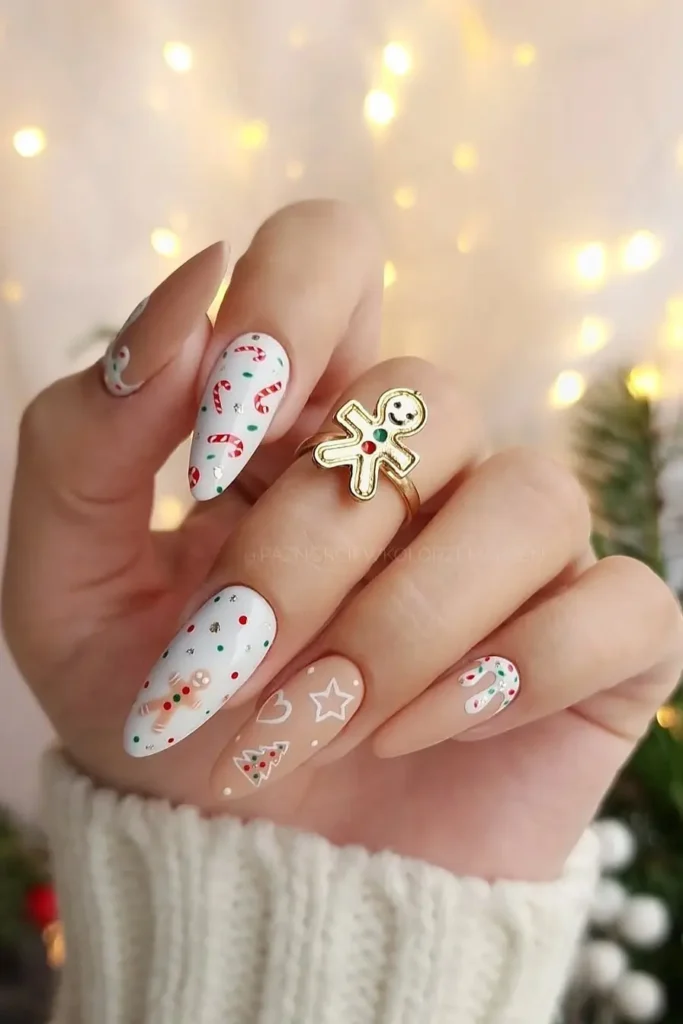
A crisp white base turns every holiday doodle into a pop of color. Two nails wear white sprinkled with red and green confetti dots, mini candy canes, and a small gingerbread man. The others go nude with white outlined hearts, stars, and trees, plus a candy cane drawn only in outline.
Mixing filled designs with outline-only ones, the way this set does, cuts your painting time in half. Outlines need just one thin white line and no color fill, and they keep the busier white nails from overwhelming the hand.
Final Thoughts
Easy nail art is mostly about choosing the right trick. Tape gives you clean angles, dots forgive shaky hands, and a liner polish does the hard part of icing for you. Pick one set, practice the motif once on a piece of paper, and give yourself a full evening so nothing smudges.
When the decorations come down, keep practicing with these easy nail art ideas anyone can do at home. The same tools work all year.
Save these easy Christmas nails for the next quiet evening you have before the holidays.