Summer vacation is the perfect time to experiment with bold nail designs that capture the season’s vibrant energy. Tropical hibiscus flowers, ocean-inspired aquas, and sunset gradients all bring that vacation feeling right to your fingertips. Whether you’re heading to the beach or staying local, your nails can tell the story of your getaway.
Choosing the right design depends on your lifestyle during those warm months. Salon services offer intricate artwork that lasts longer, while DIY approaches let you customize colors and patterns to match your personal style. Both options work beautifully when you select designs durable enough for weeks of activity.
These ten nail ideas range from simple, minimalist looks to elaborate multi-step designs. Soft pastels work wonderfully for those seeking understated elegance, while bold jewel tones and metallic accents create more dramatic statements. The variety ensures everyone finds something that resonates with their aesthetic.
What matters most is selecting something that makes you feel confident and vacation-ready. The right nail design maintains that holiday glow even during your everyday routines back home. Consider what colors and patterns genuinely reflect your summer spirit before booking that appointment or gathering your supplies.
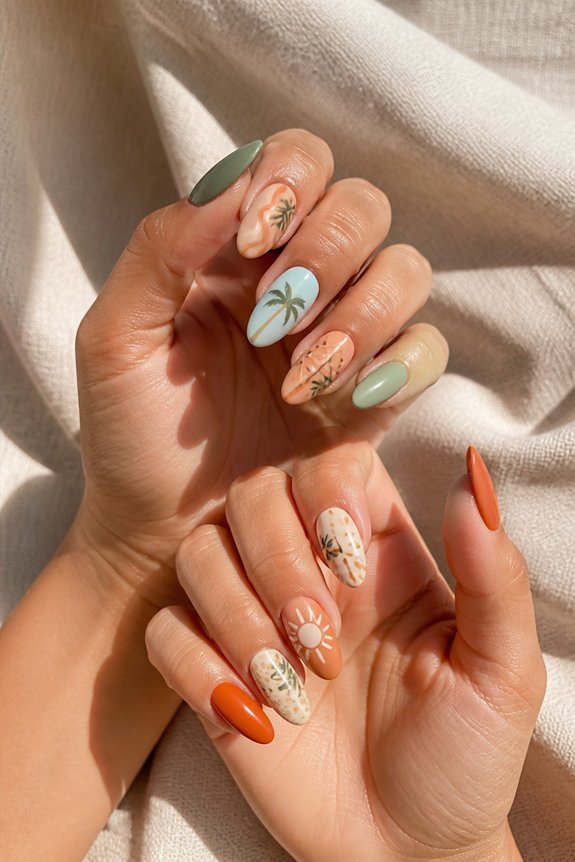
Tropical Paradise: Vibrant Florals and Palm Leaf Designs

Dreaming of the beach? Your nails can take you there. Tropical designs bring vacation vibes right to your fingertips with hibiscus, plumeria, and bold coral, pink, and orange hues.
Start with a cream base coat and hand-paint delicate flowers using thin brushes. Gel polishes like Gelish “Make a Wish” keep colors looking fresh and vibrant. Want extra pizzazz? Add polymer clay flowers or rhinestones for dimension that really pops.
Here’s a pro tip from nail artist Maria Chen: leave some empty space between your design elements. This prevents your nails from looking too busy and lets each flower stand out. Matte topcoats work great for a softer botanical feel, while glossy finishes make tropical colors really sing.
Finish with UV protection to keep your designs looking vacation-ready. Your beach getaway is literally at your fingertips.
Also read: 11 Trending Summer Nails Ideas for 2026 That Feel Fresh
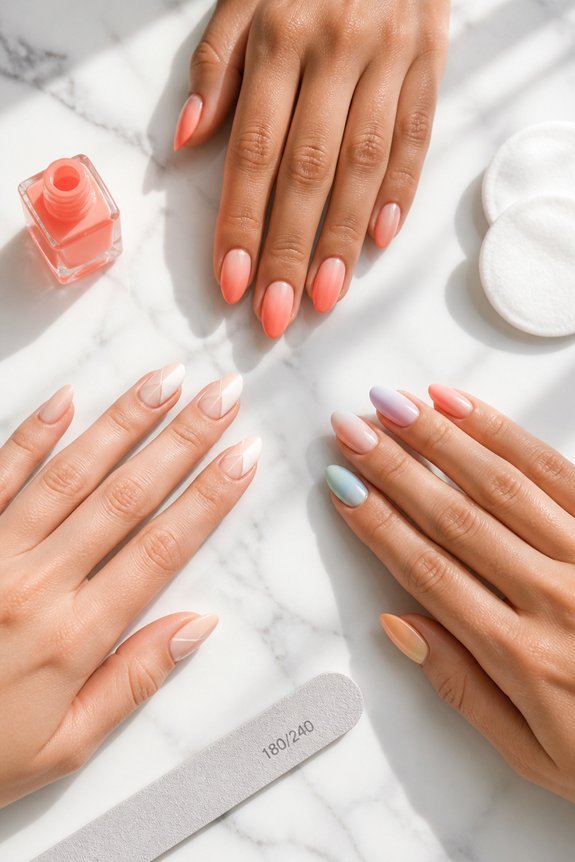
Sunset Gradients for Summer Golden Hour Vibes
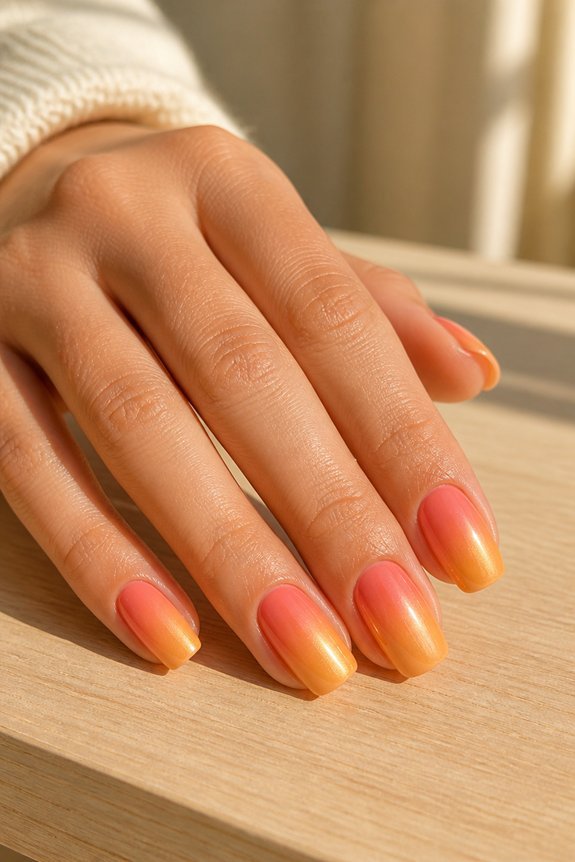
Gradient nail designs capture that magical moment when day shifts into night. Warm oranges, pinks, and purples blend seamlessly across your nails, bringing golden hour energy right to your fingertips.
Here’s how to create the look: Start with a cream base coat as your foundation. Layer sunset colors from pale yellow at the nail bed through coral, rose, and deep plum at the tips.
Grab a makeup sponge and stipple the polish sections together. This creates that diffused, dreamy effect everyone loves. The key is working gently so the colors meld rather than stay distinct.
Finish with a glossy top coat for shine and dimension. Fine glitter or metallic confetti adds extra sparkle if you’re feeling it. Almond or coffin nail shapes really let these gradients shine since you have more space to work with.
Ocean-Inspired: Waves, Shells, and Sandy Shores
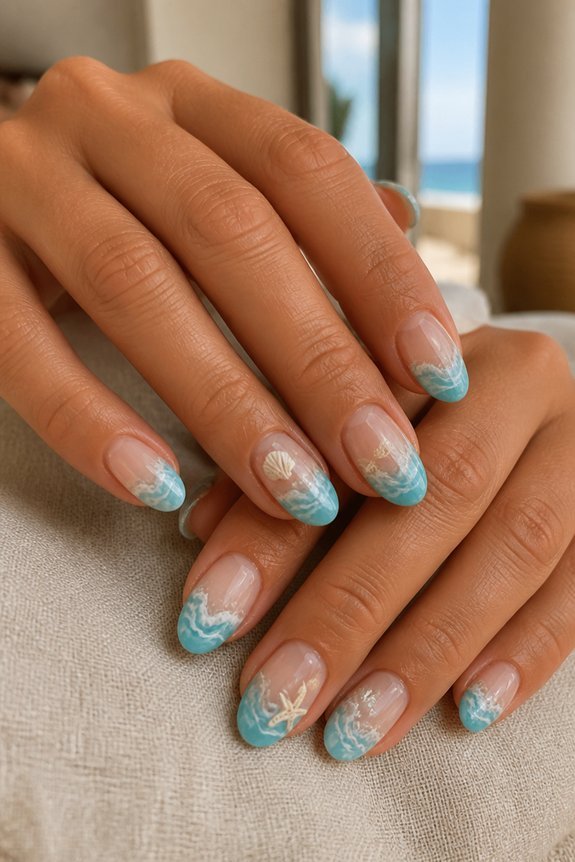
Ocean-Inspired: Waves, Shells, and Sandy Shores
Aqua and seafoam colors work beautifully as your base. Add white waves on top with hand-painting or stamps to create movement. Shell accents using metallic foils or 3D gel bring that extra touch of elegance.
Sandy shore nudes, beiges, and champagne tones feel perfect for summer. Try a textured finish with fine sand or matte topcoat to mimic real beach texture. Blend ocean blues into sandy neutrals with ombré for a seamless look.
Layer translucent blues over nude bases to show depth. This mimics where the ocean meets the shore beautifully. Pearl and iridescent accents sparkle like shell reflections, turning your nails into a tropical memory you can carry anywhere.
Flamingo and Fruit: Playful Vacation Motifs
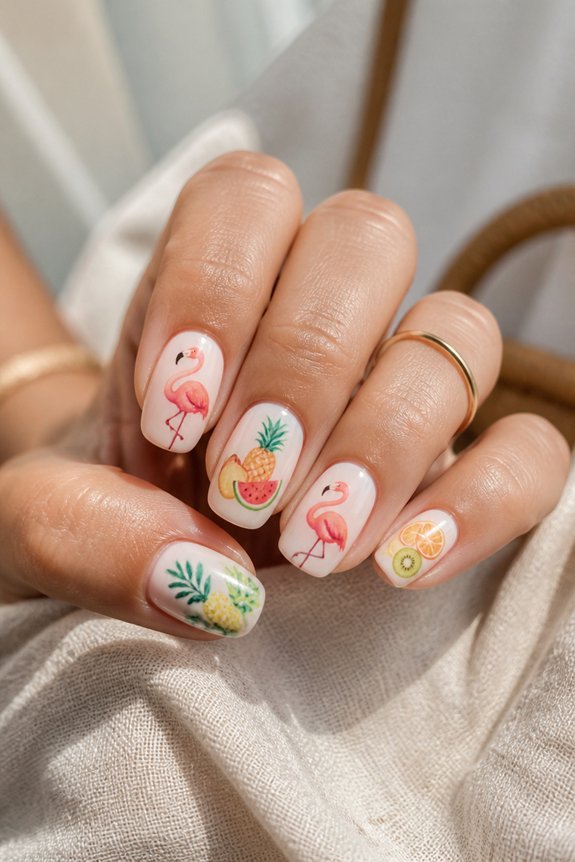
Pink flamingos bring instant fun to your summer nails. Their long legs and bold silhouettes look stunning on gel polish. Layer different gel shades to create feathery textures that feel three-dimensional.
Fruit designs are just as fun and colorful. Watermelon slices, pineapples, and strawberries pop beautifully with fine-tipped brushes and contrasting backgrounds. A glossy top coat makes the colors shine and gives that fresh vacation feeling.
Mix both themes for the perfect holiday look. Try flamingo accents on some nails and fruit patterns on others. Use quality tools like OPI tropical collections or Sally Hansen gel pens for crisp, detailed work that looks polished.
Minimalist Beach: Clean Lines and Neutral Tones
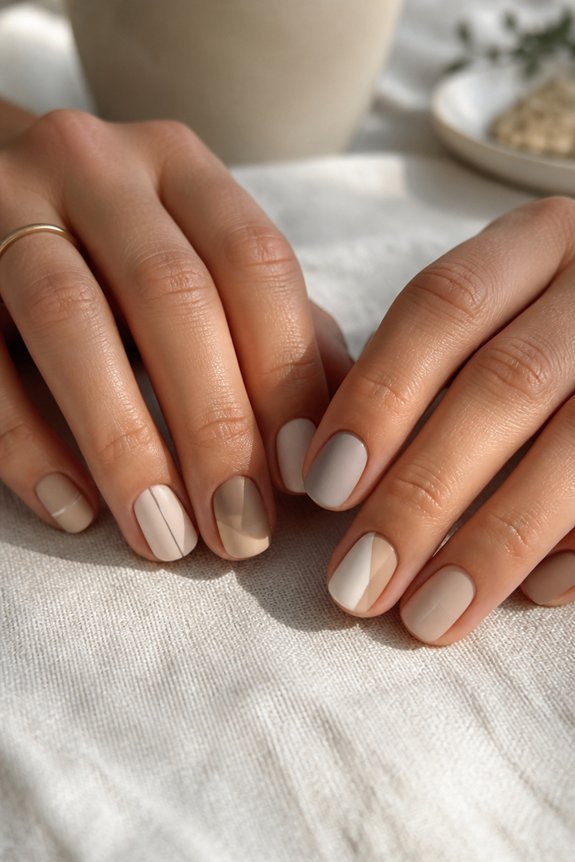
Sophisticated beach nails thrive on simplicity. Soft beiges, warm whites, and soft grays create timeless vacation looks that feel effortless. Short or long nails both work beautifully with this approach.
Start with a creamy base like OPI’s “Bubble Bath.” Use a thin striping brush to add precise geometric patterns. Horizontal lines, subtle color blocking, and negative space let your design breathe without feeling busy.
Sand-textured finishes add a tactile element while keeping things refined. Matte top coats enhance this aesthetic perfectly. Try a nude ombre that shifts across your fingertips for a sun-kissed effect.
Minimalist beach nails prove you don’t need complexity for vacation style.
Glitter and Shimmer: Resort-Ready Sparkle
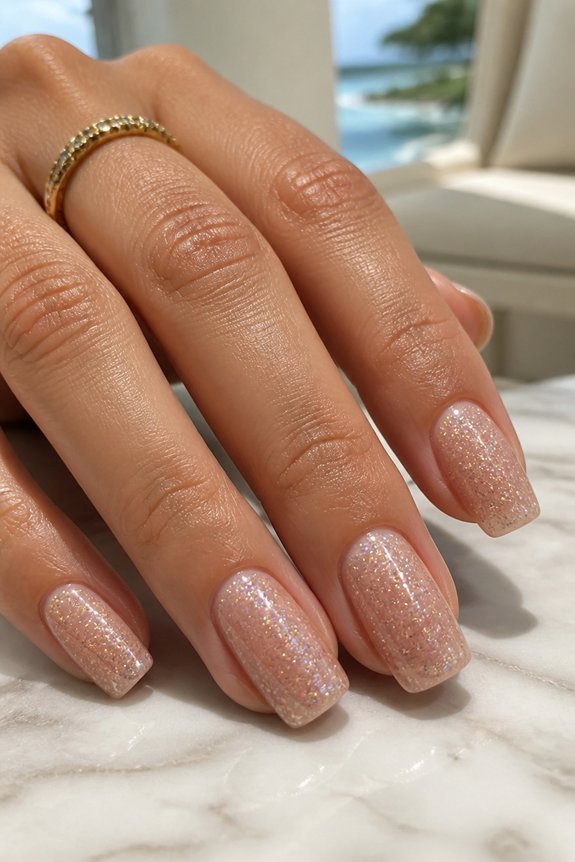
Your vacation nails deserve to shine. Glitter applications work best when you match them to your resort vibe, from subtle accent nails to full sparkle coverage. Chrome powders create that mirror-like finish that looks stunning in photos against tropical backgrounds.
The layering process is simple. Apply your gel base coat, add fine or chunky glitter while it’s tacky, then seal everything with topcoat. This keeps your sparkle intact through your entire trip.
Rose gold on nude bases feels elegant and timeless. Holographic flakes scattered across pastels give you that playful resort energy. OPI and CND make collections specifically for vacation wear that resist chipping better than regular polishes.
Mix matte and glossy finishes to add depth without overdoing the shine. Clean nail shapes and strategic glitter placement prevent your nails from looking too busy. The right balance makes your sparkle feel intentional and polished.
Geometric Patterns: A Modern Vacation Look
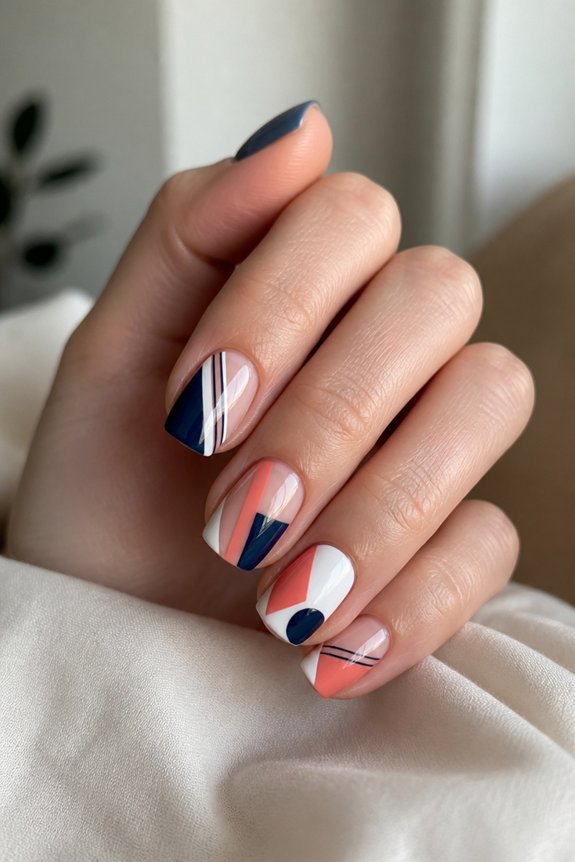
Sharp lines and bold angles give your vacation nails that contemporary edge. Think triangles, hexagons, and striped patterns in contrasting colors that pop against tropical backdrops.
Start with thin base coats. Use striping brushes or nail tape to keep your lines crisp and precise. Essie’s “Licorice” paired with white creates that perfect modern contrast.
Longer nail beds give geometric designs the space they need to really shine. If your nails are shorter, try smaller triangles or thinner stripes instead.
Negative space is your friend here. Leave some bare nail showing through for a sophisticated touch. Layer matte and glossy finishes to add depth and interest. Cobalt blue with metallic gold accents gives you that resort polish without looking over the top.
The best part? Geometric nails work for any vacation vibe. You get bold presence without sacrificing elegance, which is exactly what you need when you’re heading somewhere special.
Skill Level & Execution Tips: From Simple to Complex

Starting out? Grab some painter’s tape and pick two colors you love. Tape off sections on your nail, paint, and peel away the tape for perfectly clean stripes. It looks fancy but takes almost no practice to nail.
Moving up, try triangles and hexagons once you’re comfortable with lines. You’ll need a steady hand and a decent brush, but gel polishes from Essie or Sally Hansen make it easier since they don’t smudge as fast. Thin coats are your friend here. Layer them slowly to build color and keep things looking smooth.
Ready for the real challenge? Stack multiple geometric shapes together, throw in gradients and metallic touches. Stamping plates and dotting tools speed things up for intricate patterns. Gel systems give you the best results for detailed work since they let colors pop with depth and shine. The more you practice, the easier those complex designs become.
Salon, DIY, or Hybrid: Your Best Path to Perfect Nails
Once you’ve nailed the basics, it’s time to pick your setting. Professional salons bring precision tools, expert color matching, and techniques like gel application that are tough to pull off at home. At-home manicures give you budget savings and creative freedom, but equipment limits and technique hiccups can show in the final result.
Consider mixing both approaches. Get your intricate designs done at a salon (think holiday patterns or chrome finishes), then touch up your polish at home between visits. This strategy works especially well for summer vacations when you want salon-quality nails for photos without the full salon price tag.
Designs That Last: Which Styles Hold Up All Summer
Durability becomes the defining factor when summer heat, chlorine, and constant activity test your manicure. Gel polish is your best bet here. It holds strong for three weeks or longer without fading or chipping. Nail technicians swear by Shellac and builder gels for the toughest summer schedules.
Solid colors and geometric patterns stay looking fresh longer than detailed designs. Pick darker shades to hide any wear and tear. Your manicure simply looks newer between appointments when you go this route.
Acrylic overlays work great if you’re active all summer. Keep your nails short to medium length to avoid breaks during daily life. Matte finishes are smarter than glossy ones because they hide water spots and fingerprints.
Small touches like tiny crystals or thin metallic stripes look great without sacrificing durability. This approach gives you style without the worry of constant touch-ups.
Frequently Asked Questions
How Do I Remove Holiday Nail Designs Without Damaging My Natural Nails?
To safely remove holiday nail designs, one should soak nails in acetone for ten to fifteen minutes, then gently push off polish with a wooden stick. Moisturizing afterward prevents damage and maintains nail health.
What Nail Polish Brands Work Best for Vacation Nail Art Designs?
Like a painter selecting premium oils for a masterpiece, nail enthusiasts should choose OPI, Essie, and Sally Hansen for vacation designs. These brands offer vibrant pigments, exceptional durability, and quick-dry formulas ideal for elaborate holiday nail art.
How Long Does It Take to Complete a Full Vacation Nail Design?
Completing a full vacation nail design typically requires 45 minutes to two hours, depending on complexity. Intricate patterns, multiple colors, and embellishments extend the timeframe, while simpler designs finish more quickly.
Can I Apply These Designs Over Gel or Acrylics Instead?
Recent surveys show 73% of nail enthusiasts prefer applying designs over pre-existing bases. Vacation nail designs apply beautifully over gel or acrylic foundations, offering excellent adhesion and durability while maintaining the artistic details throughout extended trips.
What Tools and Supplies Do I Need to Start Doing Vacation Nails?
One needs nail polish, brushes, dotting tools, striping brushes, nail art pens, base coat, top coat, nail files, buffers, cuticle pushers, and stencils. Optional supplies include rhinestones, glitter, and stamping plates for enhanced designs.
Conclusion
Summer nails transform fingers into tiny vacation destinations. Whether choosing tropical hibiscus, ocean waves, or geometric minimalism, each design tells a story of relaxation and adventure. The beauty lies not merely in aesthetics but in the confidence these styles inspire. From salon visits to DIY applications, vacation-ready nails remain accessible to everyone. This summer, let your fingertips speak volumes about your wanderlust and personal style.