Hot pink is the ultimate power color for Valentine’s Day, radiating confidence, energy, and unmistakable romance all at once. This vibrant shade demands attention and makes a bold statement about your personality and celebration style. Hot pink Valentine’s nails prove that love doesn’t have to be subtle or soft to feel genuinely romantic and meaningful.
Hot pink nail designs range from solid saturated colors to playful patterns, gradient effects, and creative embellishments that showcase this stunning hue in countless ways. The boldness of hot pink allows for artistic expression and creative combinations that wouldn’t work with softer tones. I’ve found that hot pink nails work beautifully whether you prefer minimalist simplicity or intricate nail art that celebrates the color’s vibrant energy.
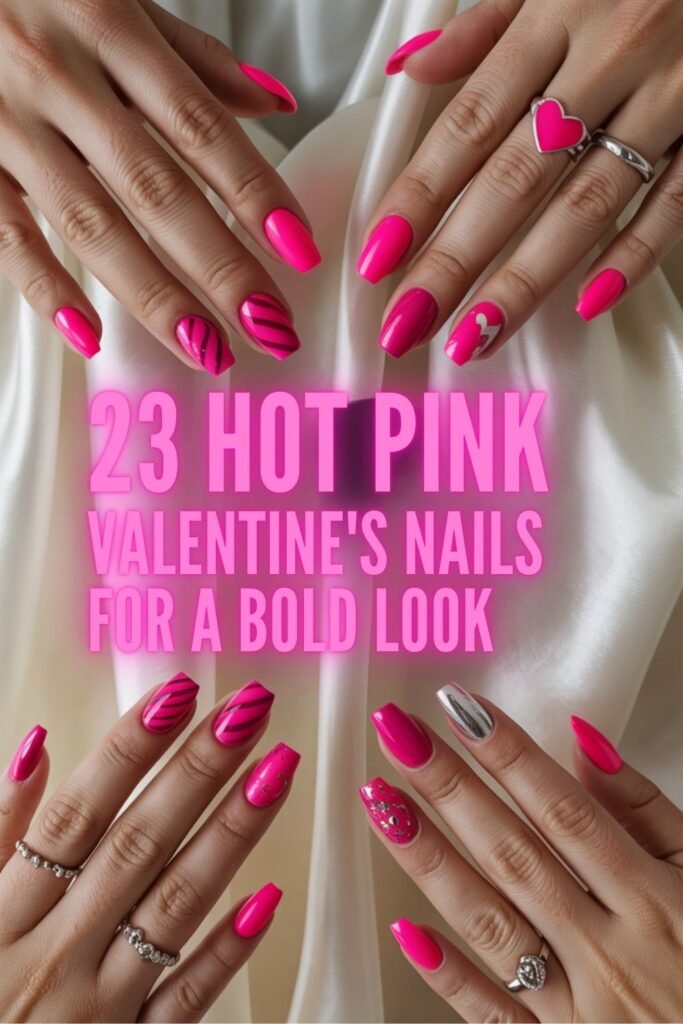
In this guide, I’ve compiled twenty-three hot pink Valentine’s Day nail designs perfect for those ready to make a bold statement this year. From classic solid applications to creative patterns, metallic accents, and detailed artwork, each design showcases hot pink’s versatility and undeniable appeal. Explore these vibrant options to find the perfect hot pink nail design that captures your confident, romantic spirit this Valentine’s Day.

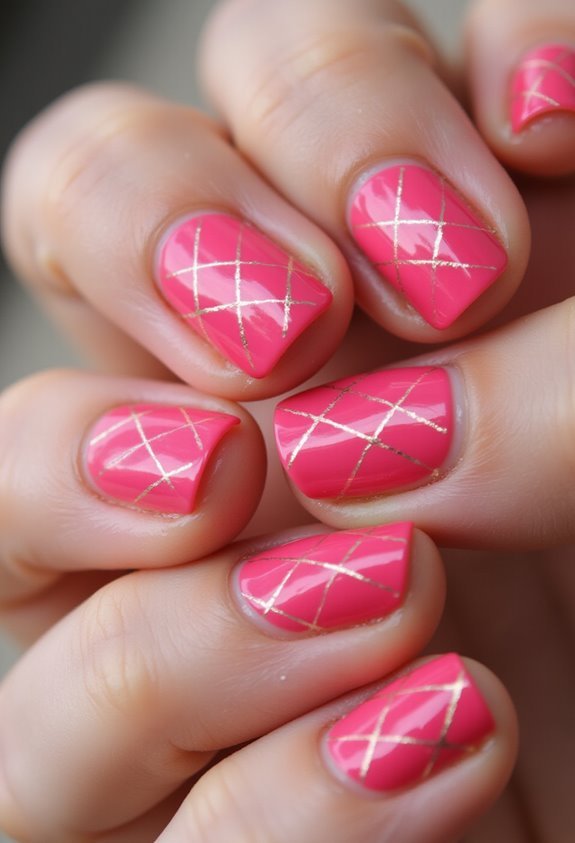
Classic Hot Pink With Gold Striping
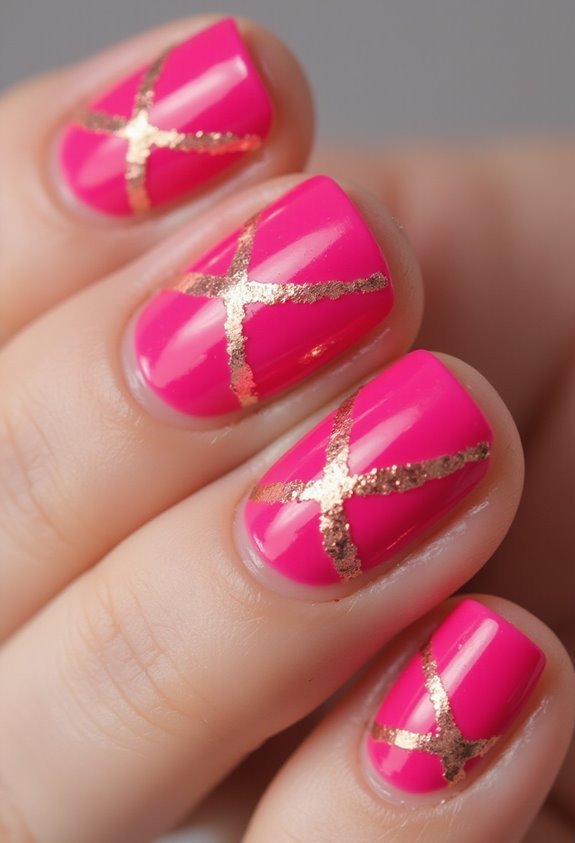
If you’re drawn to timeless elegance, this design delivers sophistication without complexity. You’ll paint your nails in a vibrant hot pink base that instantly catches light and complements any skin tone. Once dry, you’ll apply thin gold stripes horizontally across each nail, spacing them evenly for a polished effect. The contrast between the warm pink and gleaming gold creates visual interest without overwhelming your look.
This design works beautifully for both casual outings and formal events. You can customize the stripe thickness to match your preference—thinner lines feel more delicate, while bolder stripes make a statement. The combination stays trendy throughout the year, though it’s particularly fitting for Valentine’s Day celebrations. You’ll appreciate how quickly this design comes together and how well it maintains its appearance between manicure appointments.
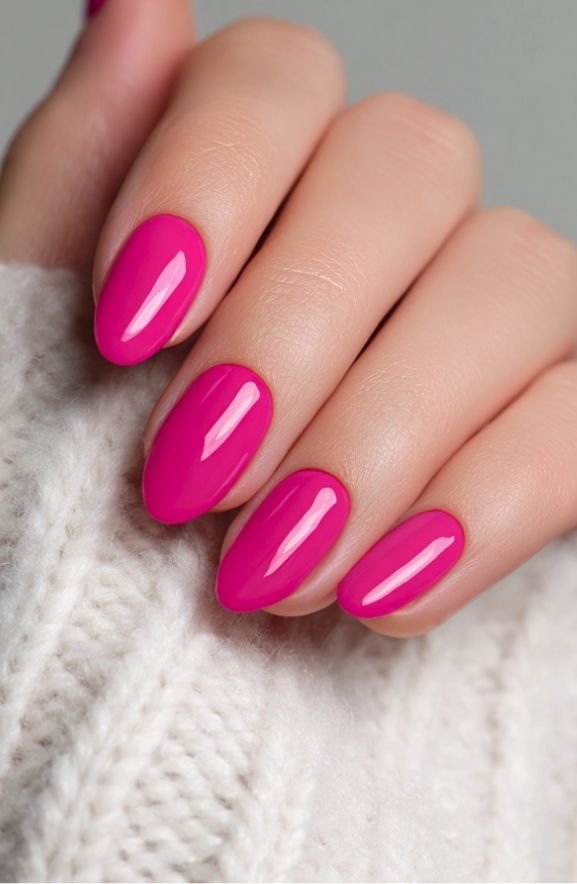
Solid Matte Hot Pink (No Tools Needed)
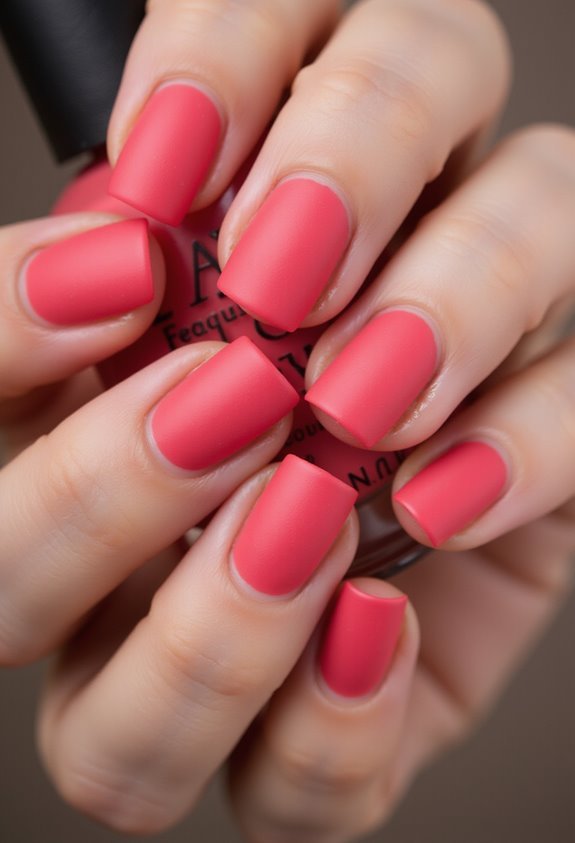
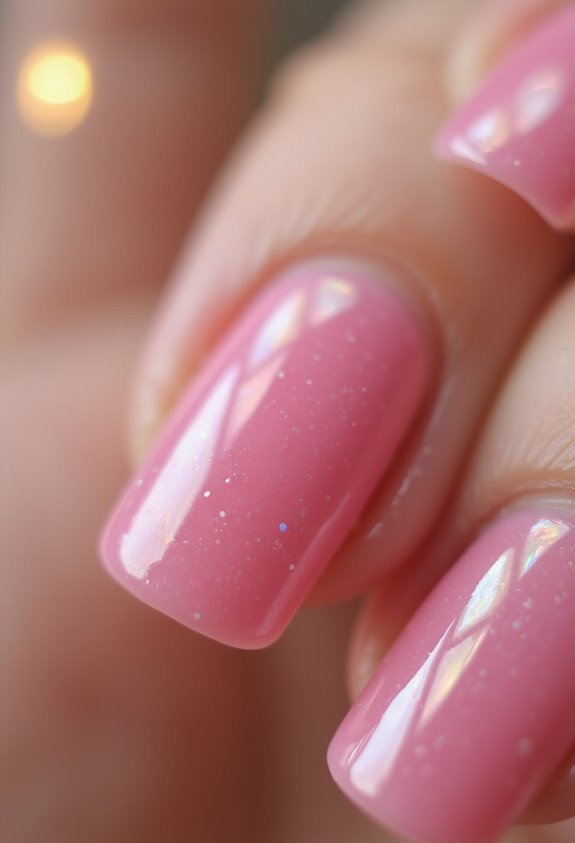
Sometimes you’ll want to skip the embellishments and embrace pure simplicity. A solid matte hot pink base delivers effortless elegance without requiring any special tools or techniques. You’ll apply two coats of your favorite matte hot pink polish for full coverage and a velvety finish that feels luxurious to the touch.
This minimalist approach works beautifully for any occasion, from casual weekdays to formal events. The matte texture adds sophistication that glossy finishes can’t replicate, creating depth through understated polish alone. You don’t need nail art brushes, stamping plates, or striping tools—just quality polish and steady hands.
The beauty lies in the color itself. Hot pink commands attention naturally, so you’re letting the vibrant shade do all the talking. You’ll achieve a polished, intentional look that proves less truly is more.
Also read: 20 Nude Valentine’s Day Nail Designs That Feel Elegant
Hot Pink French Tips in White or Nude
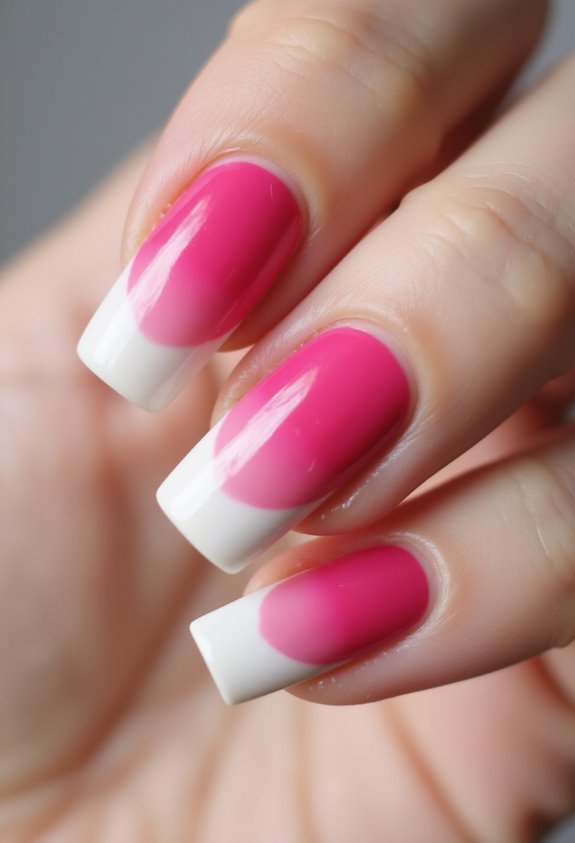
Building on hot pink’s versatility, French tips offer a refined twist that balances boldness with elegance. You’ll create a sophisticated look by pairing hot pink with white or nude tips, making your nails appear longer and more polished.
For a classic approach, you’re choosing white tips that provide crisp contrast against the hot pink base. This combination works beautifully for both casual and formal occasions. If you’re preferring subtlety, nude tips blend seamlessly with your skin tone while maintaining the hot pink’s visual impact.
You don’t need professional equipment to achieve this design. A steady hand and basic nail polish are sufficient. Apply your hot pink base coat first, let it dry completely, then carefully paint the tips in your chosen shade. The result? A Valentine’s Day manicure that’s timelessly chic and undeniably romantic.
Minimalist Gold or Silver Accent Nails
Transitioning from bold statements to understated elegance, accent nails in gold or silver deliver Valentine’s Day sophistication without overwhelming your look. You’ll appreciate how minimalist designs let a single metallic nail shine against neutral or soft pink bases. This approach works beautifully on any nail shape and length. Consider pairing one accent nail with clean lines or subtle geometric patterns for added interest. Gold suits warmer skin tones and pairs wonderfully with blush or coral bases, while silver complements cooler undertones and crisp whites. You can also try thin metallic stripes or dots for texture without sacrificing minimalism. These understated designs feel polished and intentional, perfect for those who prefer refined Valentine’s aesthetics over ornate embellishments. The result? Effortless elegance that’ll impress.
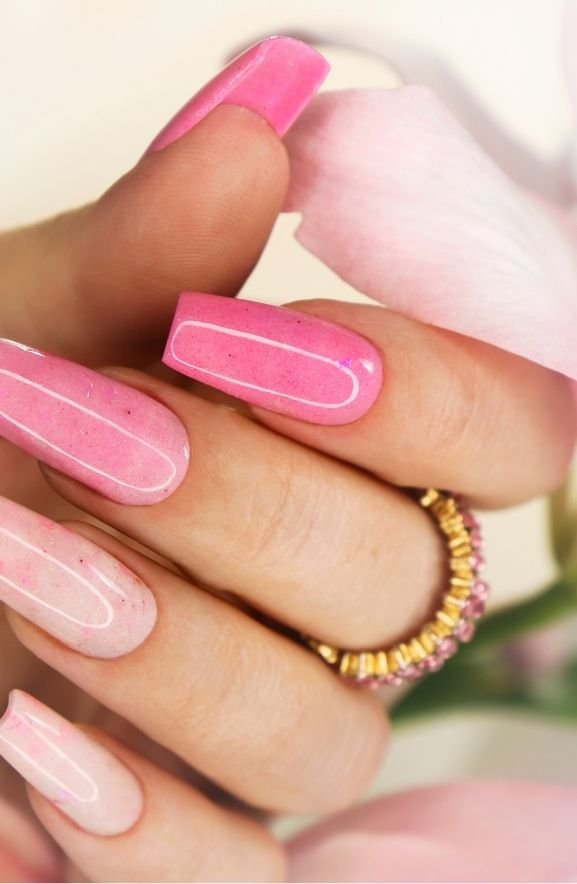
Ombre: Light to Hot Pink Fade

If you’re ready to embrace bolder color, ombre nails offer the perfect Valentine’s Day evolution from minimalist metallics. This gradient technique transitions from soft pastel pink to vibrant hot pink, creating dynamic depth on your nails.
You’ll achieve stunning results by:
- Blending with a sponge: Dab two shades onto a makeup sponge, then press onto your nail for seamless color fusion
- Layering strategically: Apply lighter pink to your nail base, then layer hot pink toward the tips for natural gradation
- Sealing with top coat: Protect your design with glossy or matte finishes depending on your preference
This approach works beautifully on short or long nails. You can customize the intensity by adjusting how much hot pink you blend in, making it versatile for any style preference.
Hot Pink and Red Blend for Extra Drama
When you’re craving maximum impact, combining hot pink and red creates a striking Valentine’s Day statement that commands attention. This bold pairing amplifies the drama you’ve built through your ombre designs, pushing the intensity further with deeper, richer tones.
You’ll want to blend these shades strategically. Try a gradient where hot pink transitions into red at the tips, or reverse the pattern for variety. Alternatively, you can create a marbled effect by swirling both colors together for an abstract, artistic look.
This combination works beautifully on shorter or longer nails. You can add metallic accents—gold or silver foil details—to elevate the design further. The hot pink and red blend demands confidence, making it perfect for those ready to make a bold romantic statement this Valentine’s season.
Hot Pink Fading to Nude (Reverse Gradient)
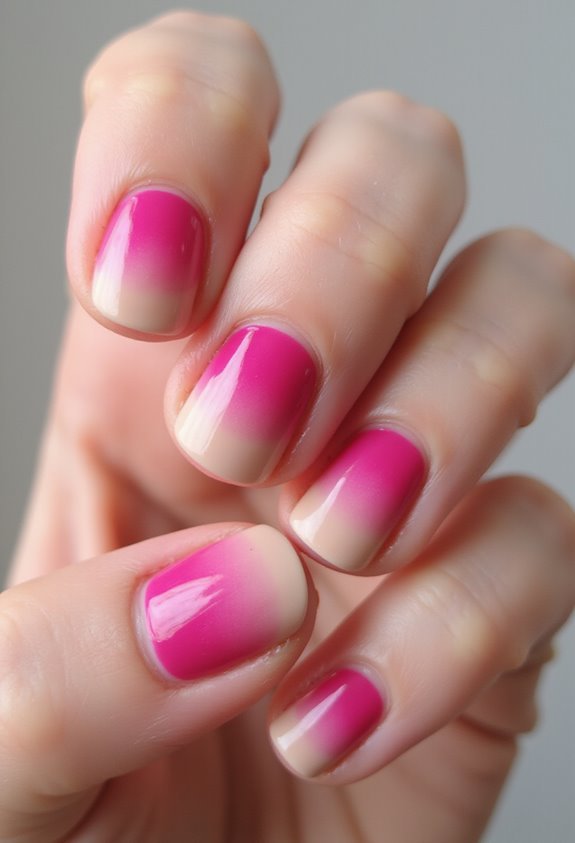
For a softer, more romantic aesthetic, hot pink fading to nude creates an elegant reverse gradient that balances boldness with sophistication. You’ll appreciate how this design transitions from vibrant to understated, making it perfect for Valentine’s Day without overwhelming your look.
This gradient works beautifully because it:
- Flatters various skin tones by grounding the boldness with neutral undertones
- Offers versatility for both professional and casual settings
- Creates visual interest while maintaining an effortlessly chic appearance
You can achieve this look using a sponge applicator to blend the colors seamlessly across your nails. Start with hot pink at the base and gradually introduce nude tones toward the tip. Add a glossy top coat to enhance the gradient’s smoothness. This design proves you don’t need intricate details to make a Valentine’s statement.
Holographic Shift From Hot Pink to Iridescent
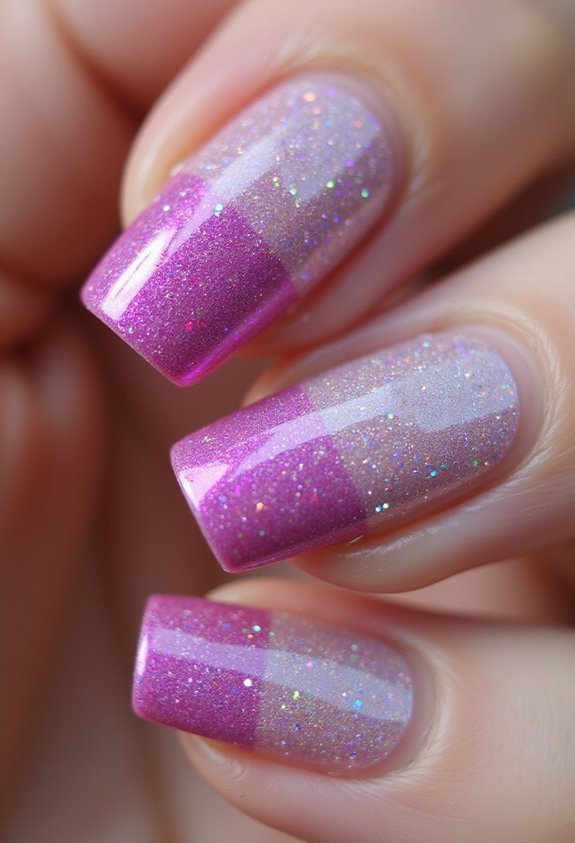
As you transition from traditional gradients, holographic finishes elevate Valentine’s nail art into futuristic glamour. This technique creates a mesmerizing shift from hot pink to iridescent tones that dance across your nails with every movement.
You’ll achieve this effect by layering holographic powders or polishes strategically. Start with a hot pink base, then apply holographic pigments to the tips and edges, allowing the colors to blend naturally. The iridescent quality catches light beautifully, revealing hints of purple, silver, and gold.
You can enhance the design by adding chrome accents or subtle glitter for extra dimension. This modern approach transforms your Valentine’s manicure into a conversation piece that showcases your bold style and creativity.
Marble Swirls in Hot Pink and White
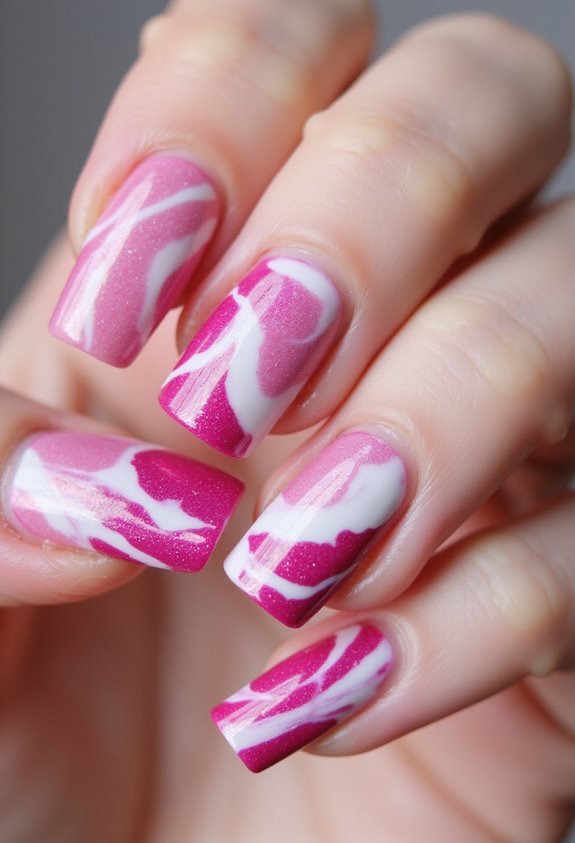
Classic elegance meets playful romance in marble nail designs that blend hot pink and white into swirling patterns. You’ll create a sophisticated yet fun look that captures Valentine’s spirit perfectly.
The marble technique works by combining your chosen colors on the nail surface, then using a thin brush or toothpick to swirl them together. This creates unique, organic patterns that never look identical—making each nail genuinely one-of-a-kind.
To master this design, you’ll need:
- A white base coat topped with hot pink polish for optimal color contrast
- A small cup of room-temperature water and a dotting tool to execute smooth swirls
- A steady hand and patience, as the technique requires careful blending before the polish dries
You’ll achieve stunning results that showcase your nail art skills while celebrating Valentine’s Day with timeless sophistication.
Hot Pink Leopard Print Pattern
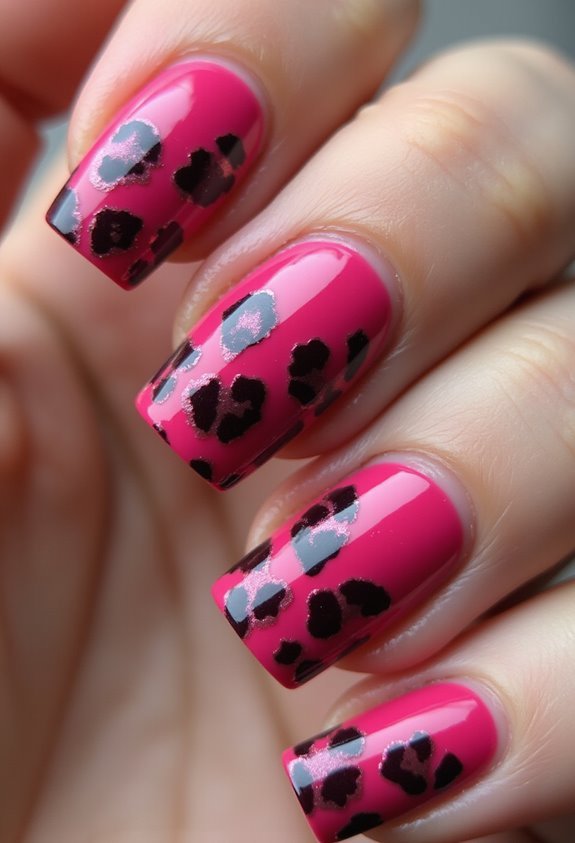
If you’re craving bold personality on your nails, hot pink leopard print delivers exactly that. This design combines vibrant hot pink as your base with darker spots in black or deep burgundy, creating striking contrast that catches every eye.
You’ll apply a glossy hot pink polish first, letting it dry completely. Then, using a thin brush or dotting tool, you’ll carefully paint irregular circular spots across each nail. The beauty of leopard print lies in its imperfection—no two spots need to match.
Seal everything with a top coat for durability and shine. This pattern works beautifully on short or long nails and pairs perfectly with any Valentine’s Day outfit. It’s edgy, feminine, and unapologetically fun.
Bold Lines and Modern Geometric Shapes
For a sleeker, contemporary Valentine’s look, bold lines and geometric shapes offer sophisticated simplicity. You’ll create a striking aesthetic by combining hot pink with sharp angles and clean designs. This approach works perfectly if you’re seeking modern elegance over romantic florals.
Consider these design elements:
- Minimalist triangles – Stack them vertically or horizontally across your nails for visual interest
- Diagonal stripes – Pair thin black lines with hot pink backgrounds to create dynamic movement
- Hexagons and diamonds – Use negative space to make geometric shapes pop against your base color
You can achieve these designs using thin nail art brushes or striping tape for precision. Layer your shapes strategically to avoid overwhelming the nail. This style suits any occasion beyond Valentine’s Day, making it a versatile choice for your 2026 collection.
Delicate Roses on Hot Pink Base
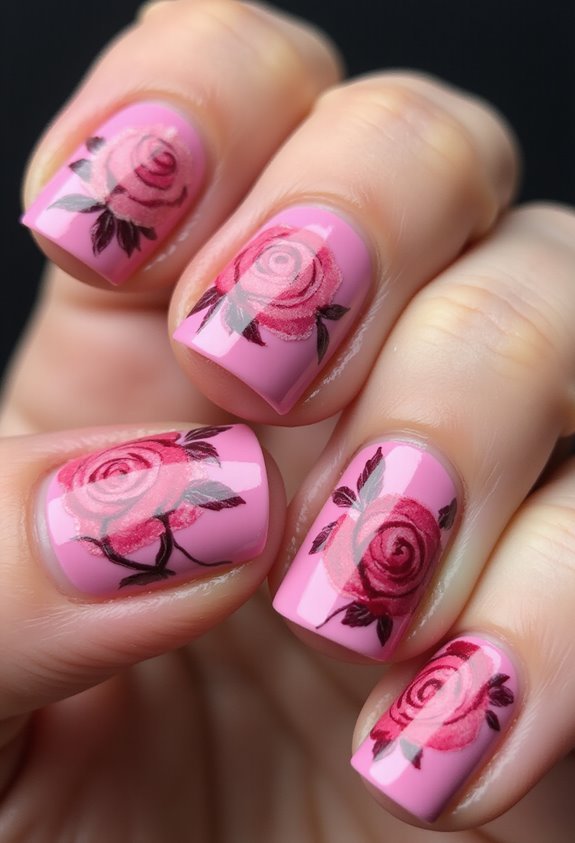
While geometric designs offer modern appeal, hand-painted roses bring romantic sophistication to your Valentine’s nails. You’ll create an elegant look by layering delicate floral details over a vibrant hot pink base that makes every bloom pop.
Start with two coats of your favorite hot pink polish for a smooth, opaque foundation. Using a fine brush or dotting tool, you’ll paint miniature roses in shades of red, blush pink, or white. Add thin green stems and leaves to complete the botanical design.
For durability, seal your artwork with a glossy topcoat. This combination balances boldness with femininity, giving you nails that feel both trendy and timeless. The contrast between the hot pink base and delicate florals creates visual interest while maintaining an undeniably romantic aesthetic perfect for Valentine’s celebrations.
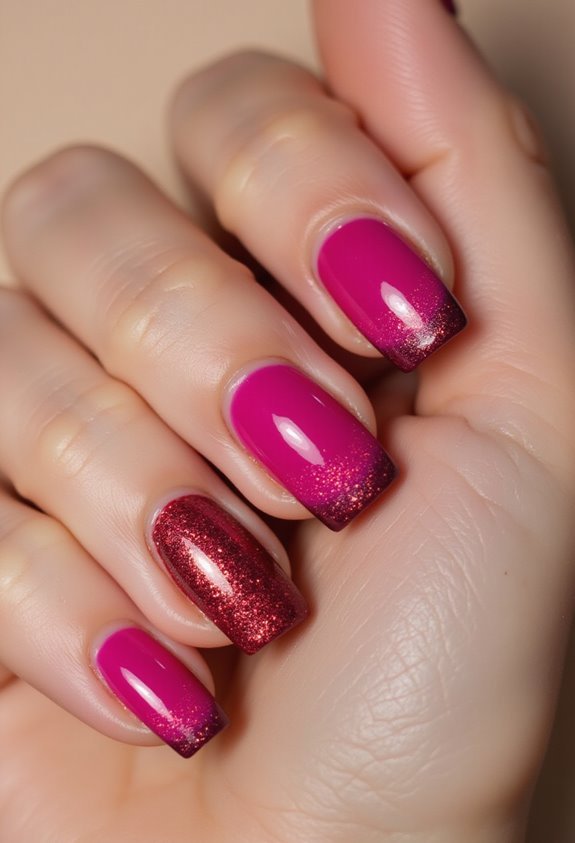
All-Over Glitter Gradient (Easiest Sparkle)
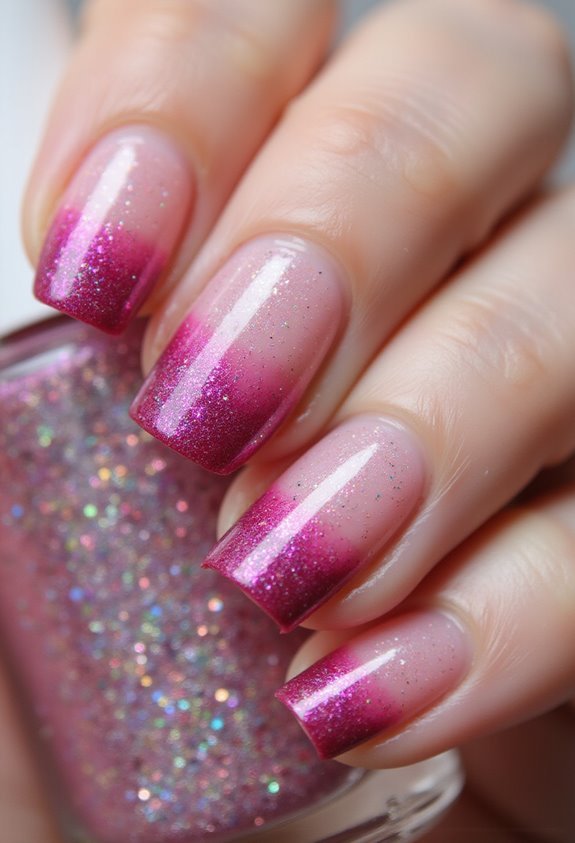
You can achieve a stunning sparkly look without mastering intricate brush techniques by opting for an all-over glitter gradient. This design offers maximum impact with minimal effort, making it perfect for Valentine’s Day celebrations.
Start with a hot pink base coat and let it dry completely. Then apply glitter polish in increasing density from the nail tips toward the cuticles. You’ll create an ombré effect that catches light beautifully.
Here’s what you’ll need:
- Glossy top coat to seal and intensify the sparkle
- Fine and medium-sized glitter particles for texture variation
- Sponge applicator for blending gradient transitions smoothly
This approach eliminates the need for detailed artwork while delivering eye-catching results. The gradient naturally flatters your nail shape and requires just two to three minutes per hand. You’ll enjoy a polished, festive appearance that lasts throughout the season.
Rhinestone-Studded Hot Pink (High-Glam)

Rhinestones transform a simple hot pink manicure into a luxurious statement that’ll turn heads at any Valentine’s celebration. You’ll want to start with a vibrant hot pink base coat, allowing it to dry completely. Then strategically place rhinestones across your nails—consider clustering them on your ring fingers or creating a diagonal gradient effect for visual interest.
For application, use a nail art adhesive or clear topcoat to secure each stone firmly. You can arrange them in heart shapes, scattered patterns, or geometric designs depending on your preference. Seal everything with a glossy topcoat to protect your embellishments and add shine.
This high-glam design pairs perfectly with elegant evening wear and demands minimal effort once you’ve mastered the placement technique.
Velvet Matte Finish (No Maintenance)
If you’re seeking an effortless Valentine’s look, velvet matte nail polish delivers sophisticated style without the upkeep. This finish eliminates the need for glossy topcoats and frequent touch-ups, making it ideal for busy schedules.
The velvety texture creates depth and visual interest on hot pink nails, giving you that luxe appearance with minimal effort. You’ll appreciate how the matte surface resists fingerprints and smudging better than traditional finishes.
Consider these advantages:
- Long-lasting wear without chipping as quickly as standard polish
- Quick application since you skip the glossy topcoat step entirely
- Easy removal with standard nail polish remover and no special products required
You can maintain your Valentine’s manicure confidently throughout the holiday season without worrying about maintenance or frequent salon visits.
Hot Pink Chrome or Mirror Finish (Salon-Only)
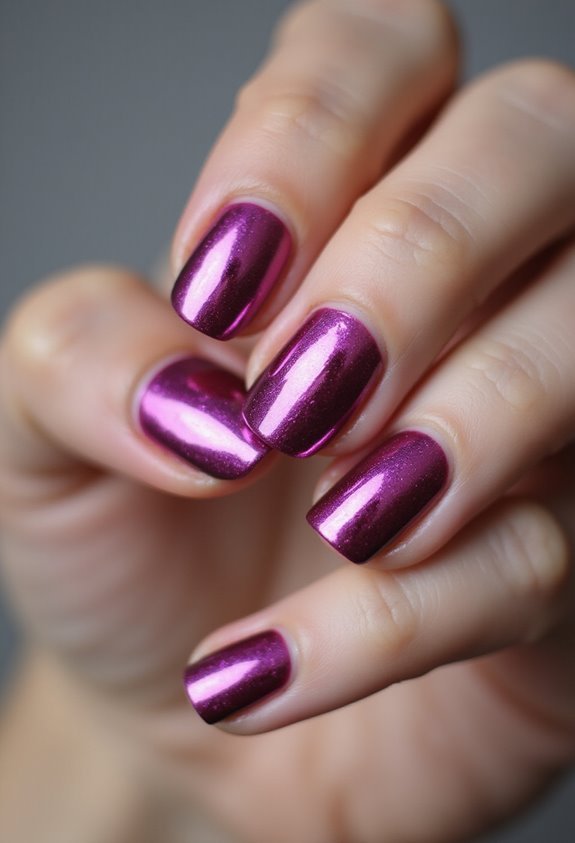
For those willing to invest in a professional touch, hot pink chrome and mirror finishes deliver show-stopping glamour that’ll turn heads this Valentine’s Day. These finishes require specialized powders and application techniques that salons perfect through years of training. You’ll experience an ultra-reflective, metallic effect that catches light from every angle, creating an almost liquid appearance on your nails.
The chrome finish demands precision application—your nail technician applies a base coat, then buffs the chrome powder onto the wet gel layer using a specific technique. Mirror finishes offer similar drama with slightly different texturing. Both finishes typically last two to three weeks with proper care.
This investment isn’t budget-friendly, but the results justify the cost. You’ll receive compliments throughout the holiday season, and the confidence boost makes it worthwhile.
Watercolor Bleeding and Brush-Stroke Effects
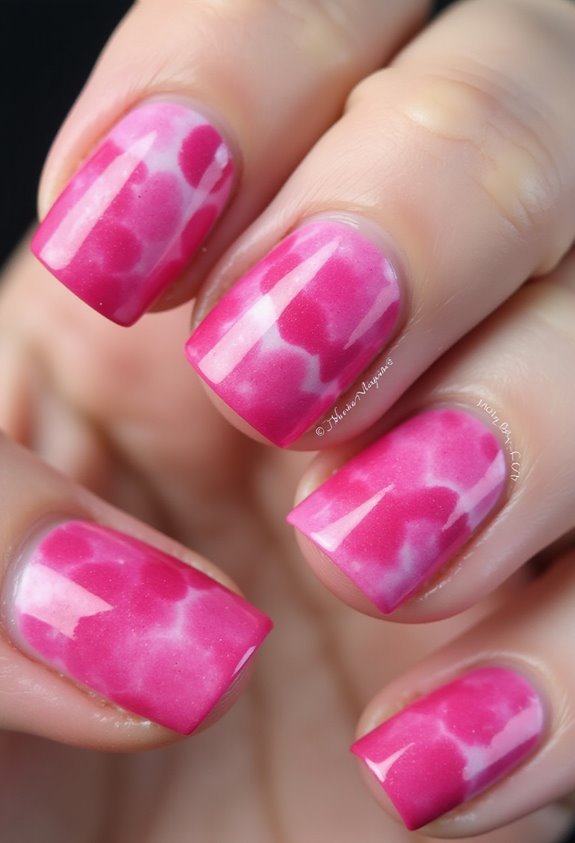
While salon chrome finishes demand professional expertise, you can achieve stunning artistic effects right at home with watercolor bleeding and brush-stroke techniques. This approach gives you creative control and lets you express your personal style.
To master these effects, you’ll need:
- Quality gel or acrylic paints in varying pink shades for seamless color transitions
- Thin, precision brushes that allow detailed strokes and controlled application
- A water-based medium or thinner to create the bleeding effect between colors
Start by applying your base coat, then use diluted polish to paint soft, feathered strokes across your nails. Let colors naturally blend where they meet, creating organic watercolor transitions. Build layers gradually, allowing each section to set slightly before adding new hues. This technique produces romantic, artistic designs perfect for Valentine’s Day.
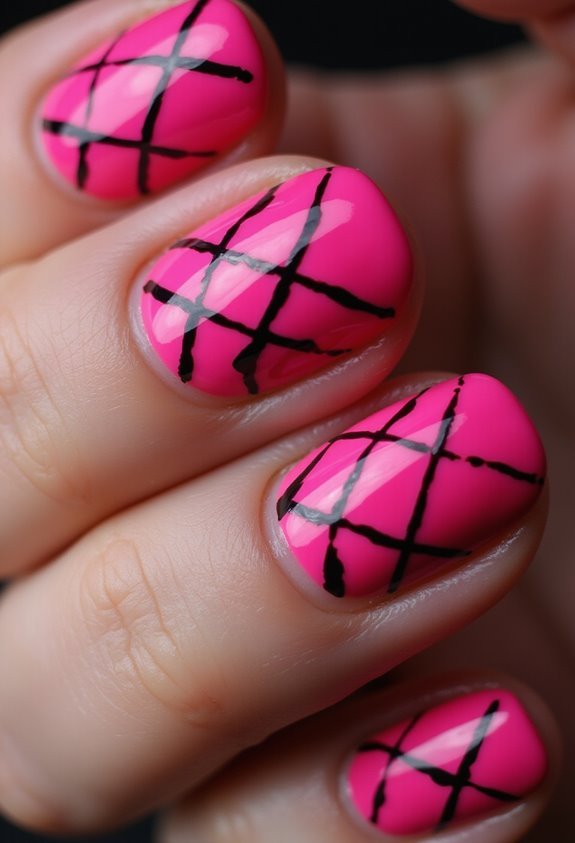
Black Line Work and Geometric Details
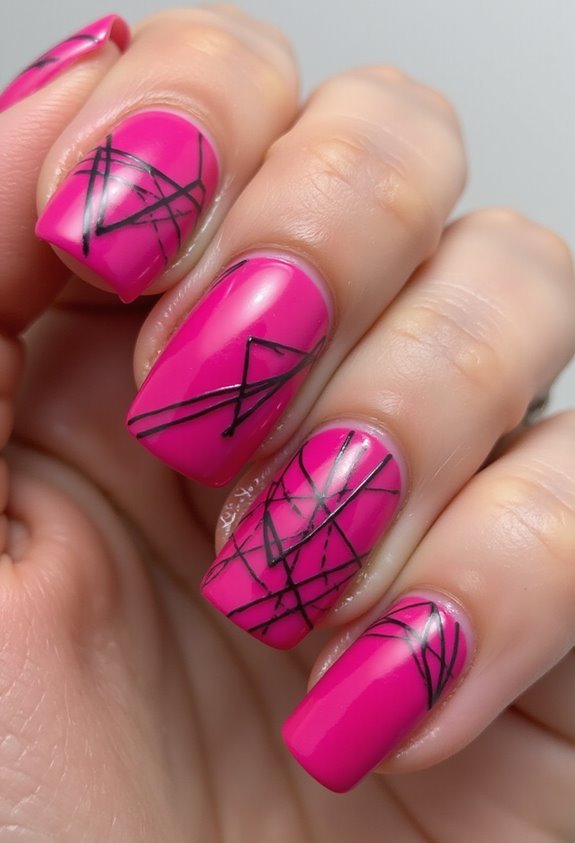
Once you’ve mastered watercolor techniques, you can elevate your Valentine’s designs by adding crisp black line work and geometric patterns. These details create striking contrast against hot pink backgrounds and soften bold colors with precision.
Try incorporating delicate hearts outlined in black, creating dimension and definition. You can also experiment with geometric shapes—triangles, hexagons, and diamonds—that frame floral elements or form abstract patterns across your nails.
Use a fine-tipped brush or nail art pen for clean, controlled lines. This technique works particularly well on accent nails, where bold geometric designs won’t overwhelm your manicure. The combination of organic watercolor washes with structured line work balances softness and sophistication, giving you a modern Valentine’s aesthetic that’s both romantic and edgy.
Negative Space: Cutouts Showing Skin or Nude Base
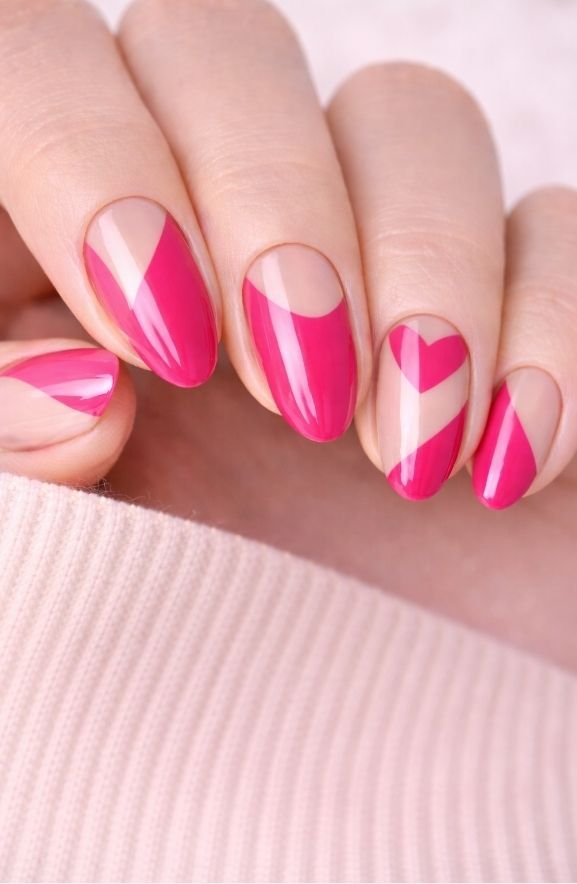
Negative space—the intentional absence of polish—creates a bold, minimalist approach to Valentine’s nail art. You’ll achieve sophistication by letting your skin or nude base peek through strategically placed cutouts.
This technique offers versatility:
- Geometric cutouts frame heart shapes or romantic patterns while maintaining clean lines
- Partial coverage on nude bases provides an understated elegance that complements any skin tone
- Negative space accents highlight specific nail sections, drawing focus to delicate details
You can combine hot pink polish with these cutout designs for striking contrast. The exposed areas create visual interest without overwhelming your nails. This approach works particularly well for professional settings where you want Valentine’s flair without boldness. Consider asymmetrical layouts or strategic side cutouts to elevate your design further.
Glazed Donut Effect in Hot Pink
The glazed donut effect brings a glossy, translucent finish that you’ll achieve by layering sheer hot pink polish over a nude or milky base. This technique creates an elegant, dimensional look that’s perfect for Valentine’s Day.
To execute this design, start with a creamy nude or pale pink base coat. Once dry, apply two to three thin coats of sheer hot pink polish, allowing each layer to set before adding the next. The key is building color gradually rather than applying one thick coat.
Finish with a high-shine topcoat to enhance the glazed appearance. The result mimics the dewy, translucent quality of a glazed donut while maintaining sophistication. Your nails will appear polished, modern, and subtly romantic—ideal for the holiday.
Hot Pink With Contrasting Cool-Tone Tips
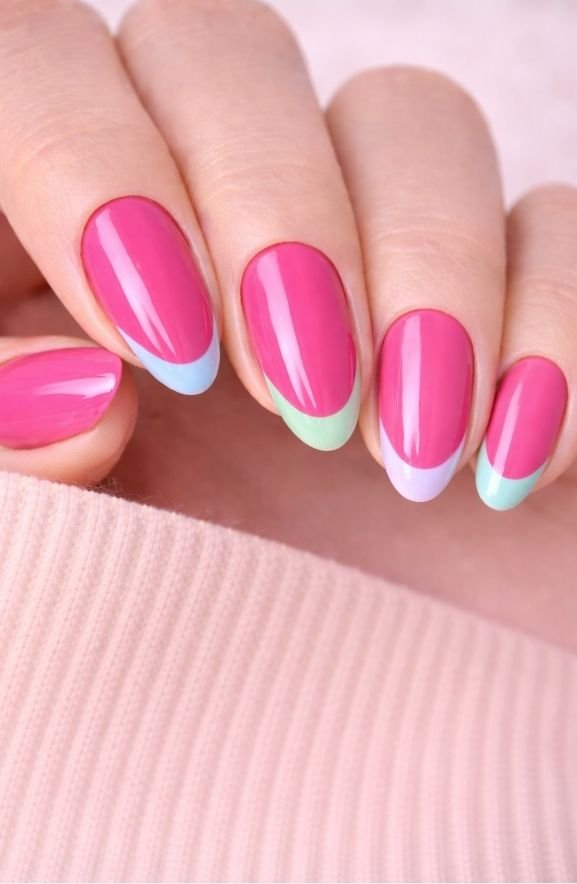
If you’re craving more drama than the glazed donut’s subtle elegance offers, hot pink with contrasting cool-tone tips delivers striking visual impact. This design pairs a vibrant hot pink base with cool-toned accents—think icy blues, silvers, or lavenders—creating a bold temperature contrast that immediately catches attention.
The cool tips act as a visual counterbalance, preventing the look from feeling one-dimensional. You’ll achieve a modern, fashion-forward aesthetic that works for any Valentine’s occasion.
Design variations to consider:
- Gradient cool-tone tips that fade from hot pink into silver or periwinkle
- Geometric cool-toned designs overlaid on the hot pink base
- Metallic cool-tone accents with glitter or chrome finishes
This combination showcases your confidence while maintaining sophistication through intentional color theory.
Floral Designs on Hot Pink Base

Romance blooms when you layer delicate floral motifs over a hot pink base, creating an inherently feminine design that’s perfect for Valentine’s Day. You’ll find this style works beautifully with various flower choices—roses, peonies, or cherry blossoms all complement the vibrant backdrop. Consider painting tiny blossoms across your nail tips or scattering them randomly for an organic feel.
To achieve this look, start with a hot pink base coat and let it dry completely. Using a thin brush or dotting tool, carefully paint your flowers in contrasting colors like white, coral, or deep burgundy. Add delicate green stems and leaves to enhance the botanical aesthetic.
This design elevates your Valentine’s nails with romantic flair while remaining sophisticated and wearable for any occasion.
Glitter Gradient and Shimmer Effect
While floral designs offer timeless elegance, you might crave something more dynamic and eye-catching for Valentine’s Day.
Glitter gradient nails deliver exactly that effect. You’ll layer fine shimmer particles across your hot pink base, transitioning from subtle sparkle near the cuticle to dense glitter at the tips. This creates depth and movement with every hand gesture.
To achieve this look, you’ll need:
- Fine cosmetic glitter in rose gold, silver, or pearl tones
- A clear or slightly tinted gel base for adhesion
- A soft brush to blend the gradient seamlessly
Apply your hot pink base first, then work the glitter upward in sections, building intensity gradually. The shimmer catches light beautifully, making your nails appear multidimensional. This design works perfectly for date nights or Valentine’s celebrations.
Conclusion
You’ve got an endless palette of hot pink Valentine’s designs at your fingertips—from timeless classics to trend-setting styles that’ll make your nails the talk of the room. Whether you’re drawn to minimalist elegance or bold geometric patterns, there’s a design that speaks to your personal style. Mix and match these ideas, experiment fearlessly, and let your manicure become a canvas where your romantic spirit truly shines.